
DIY Photo Studio Guide
When working on a small budget, an in-home or in-office photo studio is the way to go. Whether you’re a designer or creative at an advertising agency or an aspiring photographer with some free time, this makeshift photo studio guide is for you. Here I’ll go through what you’ll need to get started and how you’ll want to first set up your makeshift photo studio to get high-quality photos on a low budget!
What You Need
- Camera (preferably with Manual settings)
- Tripod & Remote
- Background (seamless paper, poster board, sheet)
- Table top
- Lighting
- Natural light from window
- Desk lamp or flash (with umbrella and wireless sync)
- Reflector (5 in 1)
- Office supplies that may come in handy
- Tape
- Paper & Binder Clips
- Lint Roller
Research
If your photo studio is going to be temporary and only set up when you need pictures, you’ll want to make sure you know what you’re shooting first. Whether you’re taking pictures of products for an advertisement or taking headshots for an updated website, there’s almost always a mood or direction a photographer is given to make sure the image gives off the right feel. A company may have a laid back environment and would like to show that in their headshots, so they’ll ask the photographer to capture more of a casual and relaxed expression, rather than a professional and straightforward one. When it comes to product photography, a company may be setting up or updating their ecommerce site and need straight, professional photos of each individual product on a white background, or they may need pictures of their products in everyday use or in a staged environment. Whatever it is you’re going to be shooting in your homemade studio, you’ll want to make sure you go into the shoot knowing what is expected at the end of it. While you start to brainstorm your shoot, try researching what it is you’re going to be shooting to find examples of the same or similar products or headshots. You’d be surprised how much of what you need to shoot has already been done in one way or another and how many people even write or record tutorials on how they did a specific shoot. This will help you figure out how you’ll want to set up your studio in regards to lighting, background and any additional props or setup you may need. Just make sure you remember to give your images your own touch. Photography isn’t about copying what everyone else is doing—it’s about being inspired and motivated by other’s work to create your own.
How to Set Up Your Studio
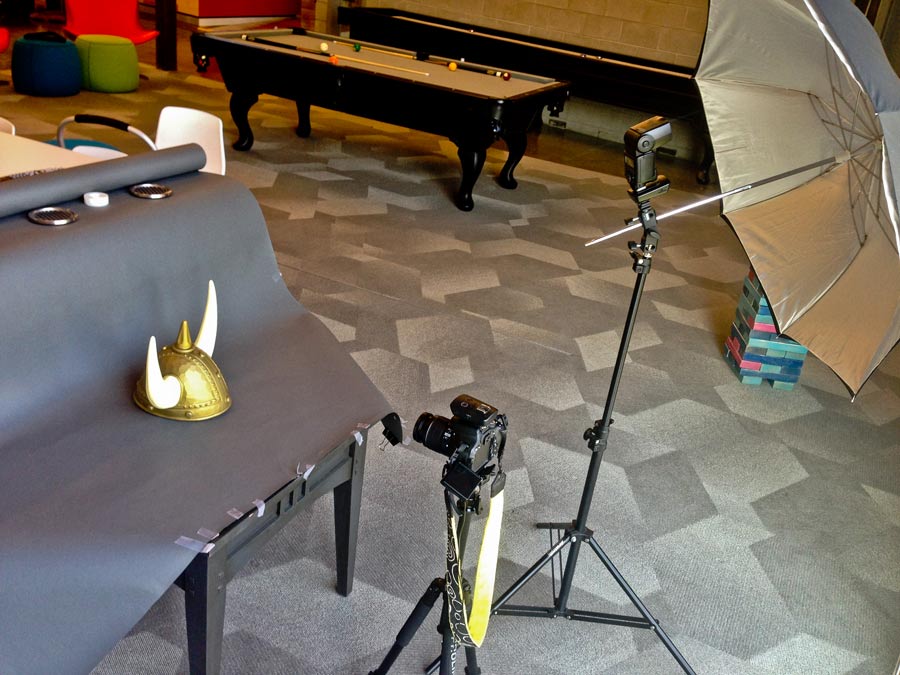
Space
Now comes the part you really came to this blog for, creating a makeshift photo studio. You’ll want to find an open space that’s at least 6’x6’ and if possible, in front of or next to a window for natural light. If you’re in your home, this space may be in the living room against a wall or right in front of a couch. If you’re at your workplace, a conference room or break room may be your best option. You want to make sure you give yourself enough room for your camera to be back far enough from your subject, as well as your light(s) and yourself, and make sure you’re not in the way of coworkers, clients or maybe your dog or kids if you’re doing this at home.
Background & Surface
The first part to set up will be your background. If you decided to go with either a sheet or roll of paper, tape or pin your paper/sheet up to the wall you may be up against. If you don’t have a wall, you may be able to use a piece of furniture or get a stand made just for backgrounds like this one. If you’re doing portraits or shooting a large product, you’ll want your sheet or paper to roll onto the ground and out in front, creating a curve in the back, ultimately creating a seamless background.
You may need to use paper weights, books, or anything heavy you have nearby to hold this down and keep the background straight and perfect. If you’re doing a smaller product shoot, be sure you have taped or pinned your background above a table or another flat surface. This is what you will be placing your product on so you’ll want to make sure it’s a big enough and flat enough surface for your product. As with the larger background, go ahead and let it roll out to the front of the surface, using a weight or tape to keep it down in place. Here is where you can substitute the sheet or roll of paper for a large poster board. Of course, whatever color you want to use is up to you, but most photographers will recommend using a white or grey background for portraits or products.
Camera & Tripod
The next step for your studio is setting up your camera and tripod. Where you place your camera will be dependent on the angle you want for the subject. In most instances, you can place your camera centered right in front of the subject. Of course, while you’re shooting you’ll be able to move around your camera and tripod as you wish. The exact camera settings you’ll use can vary greatly for every shoot, angle and even subject. You’ll need to take some test shots and play around with your settings once you’re ready to shoot to figure out the best combination.
Lighting

Source

Source
If you’re lucky enough to be shooting right in front of a window during the day, you may notice that you might not need any other lights for your shoot. Natural light can give your images a bright, clean feel if done correctly. However, you may want to diffuse the window light if your window happens to be receiving direct sunlight as direct light can often hurt a photo shoot. You can do this by simply covering up your window with a white sheet, using a diffuser or shooting on a particularly cloudy day.
If you don’t have nice and natural window light or think you’ll need extra light for your shoot, now is when you’ll set that up. How you set up your lights will depend on what you want your images to look like. You may want your subject fully lit, or you may only want parts of it lit, creating a sense of depth and dimension in your image. This will also be dependent on whether or not you’re photographing a product or a person. Here are a couple diagrams I created using www.lightingdiagrams.com to reference when setting up your lights.
Shooting Tips
Products

If you’re going to be doing some product shots in your studio, here are some tips. First, as mentioned earlier, be sure you know what is expected from this shoot. You’ll want to understand the feel your image is supposed to give off and take the time to research ahead of time examples of similar products and set up. While shooting, make sure you take multiple images of the same shot. For example, leave your lights, camera and product in the same spot and only change one or two of your settings within your camera. You may find during post production and review that you like the depth of the shadows in one image and not the other. You may even want to give shooting for HDR a try. An easy way to do this is by taking three images, one over exposed, one under exposed, and one in the middle. Later you’ll be able to use the HDR tool within Photoshop to create a more surrealistic image. While shooting, play around with different product positions, camera angles, lighting, even backgrounds.
Portraits
If you’re going to be taking portraits in your studio, here are some tips. Like with products, make sure you know what’s expected and that you do your research ahead of time. You’ll also want to play around with different angles, figuring out what works best for your model and end result. If you have the time, take at least 10 shots of any person you’re photographing. You’ll want to make sure you have enough to work with in case the subject may have half-blinked in one image or looked the wrong direction in another. You’ll find the more pictures you take, the more comfortable and relaxed the person may become, ultimately giving you a better, more personal photo!
Conclusion
Making your own makeshift studio can save you a lot of time and money if you need pictures quickly, or just want to practice your photography skills. Once you have the right equipment, the perfect space and your creative juices are flowing, you’ll be taking professional studio photos for your website or client in no time.