Character Rigging in Adobe After Effects
Originally, Adobe After Effects was not designed for animating characters. Usually those tools are found in programs like Adobe Flash, or 3D packages such as Cinema 4D, 3Ds Max, Maya, etc. But thankfully, the genius Duduf created an amazing and free script which he posted on his website, allowing us to now use After Effects for character rigging.
I used this technique in a video created for Zion & Zion client, Century 21 Northwest. You can view the video here, or download the full rig.
Century 21 Northwest is the most recognized and trusted name in real estate. We work around the clock to make your real estate investment a money maker, maximizing your income and protecting your valuable assets. Whether you own a large portfolio or just one home, we will organize and track all aspects of your rental property for you, including property management, accounting, payment processing, tenant relations, portfolio management, legal support, and compliance. We will also look to find new revenue opportunities, and when it’s time to recoup your investment, we’ll manage every step of the sales process for you.
Founded in 1971, our team of realtors, accountants, analysts, contractors and problem solvers use our proprietary technology to find and select the best tenants for your property, handle all tenant phone calls, coordinate and negotiate with vendors for maintenance and repair, establish ongoing home care schedules to prevent wear and tear, collect rents and transfer them straight to your bank account. Plus in the unlikely event of an eviction, we’ll handle it every step of the way.
Once we begin managing your properties, you can easily access all information regarding your investment through our state of the art, 24/7 Cloud-based application. From the secure log in via an online portal or mobile Smartphone applications, you are able to maintain spending limits on repairs, quickly reference leasing terms and dates, and transfer money for property related fees. You are given real time access to your investment properties’ financial statements, electronic billing and invoicing, automated monthly reports, and more.
With online payment through the portal, you can also receive your monthly income quickly and accurately, right into your bank account. The Century 21 Northwest Moneymaker program is the complete package for maximizing your property investment. Call 623-282-1021, or email moneymaker@c21northwest.com to get started with our team today.
If you’re reading this article, I’m going to hope that you have a fairly good knowledge of After Effects, as I will be jumping into somewhat advanced how-tos in order to explain how to rig characters in After Effects. If you are not familiar with this program, I would recommend visiting the Adobe Classroom to learn some of the basics first.
Download and Install the Tools

First, you are going to want to download and install Duduf’s IK Tools. To install, simply download, unzip the file, and then copy and paste over the three files. I work on a Mac so it might look a little different for you if you work on a pc, but it’s still the same process. Once you have your three files, you will want to place them into your scripts UI folder within your After Effects application folder. My path looks like this: Application/Adobe After Effects CC/ Scripts/ ScriptsUI Panels. Again, yours might look a little bit different.
Test the Tools
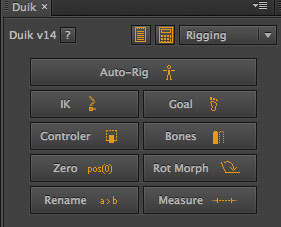
Cool, so now you have the tools installed. Let’s just make sure everything is working as it should be, before jumping too far into things. Go to your window tab and look for “duik.jsx.” If you have that, boom! Go ahead and click it. Next, it will most likely ask you to enable “Allow Scripts to Write files and Access Network.” Enable it, and you’re ready to go. You should get a dock of icons that look like the image to the right. If you do, then you are good to go.
Rigging a Character
So once we have all of that taken care of, we are ready to go and rig. I will be working with a very simple character that I created in AE (After Effects), but this technique works just as well with characters created in Illustrator; you just have to make sure you have broken that character up, and make sure that it is AE ready. If you’re not totally sure how to go about breaking your character up further, it’s basically breaking apart your character, and then placing its individual components into their own separate layer so that when you import that AI (Adobe Illustrator) file, you have several different layers, instead of just one. The scope of this article won’t go into this in any more detail, but there are several tutorials and blogs on how to do this. Here are two of my favorites:
Precomp the Limbs of Your Character

This is the simple character I created in AE; you will notice the left side of his body is red. That’s just to help me to differentiate what body part is what. If you want to do something similar, you could simply throw a fill effect on top of your limb, and then disable it when you’re ready to render. You can find the fill effect in “effect/generate/fill.” In this rig, I’ll be using the puppet tool, as well as the Duik script. Together, they will create the rig. On each of your limbs, you will want to precomp them into their own comps to allow the puppet tool to work correctly.
Add Deformation Points

Now that you have each limb precomped, you will need to add deformation points—let’s start on the right leg.
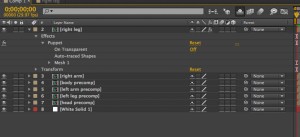
This is what my leg looks like with puppet pin points. Select the puppet tool, and add three points in the leg, starting at the bottom and working your way up. Next, add the deformation points in the following order: foot, knee, hip.

Now that you have three points, let’s bone it and add the IK chain. After doing this, you want to twirl down the puppet effect in the timeline, and click on each puppet pin, and add a bone using Duik. First, select pin one, add bone, pin two, and then add a bone, and finally pin three, add a bone.
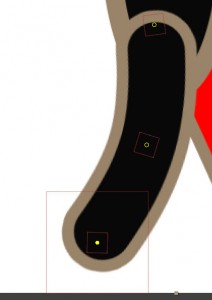
Next, we have to change the names of our bones. If we don’t, it won’t work properly in the later stages. Change the bone names to “right foot,” “right knee,” and “right hip.” Now you have all of the bones you need. You can now add a controller to the bones, selecting the bottom foot bone and clicking the controller button on the Duik panel. Your comp should look something like this. Finally, all you have to do is parent two bones together to allow the IK chain to work. Start with the right foot, grab the pick whip icon, and parent that to right knee. Then parent the right knee to the right hip.
Create IK Chain for Animation
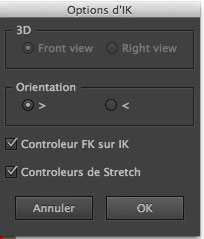
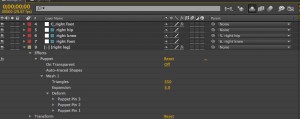
This is it! Now we are ready to do the final step in creating our IK chain for animation. Select the right foot bone, right knee bone, right hip bone, and finally your controller, in that order. Click the IK button on the Duik panel. You will then see this new panel. It will ask you what orientation of the knee joint you will want. Think of the point on the > as what direction you want it to go, and click “ok.” If you want to change it for whatever reason, you can easily do so in your effects panel. Under IK orientation, there is a check box you can check to flip the direction. Boom! Your controller should be working, and you now have a complete IK chain. This is what a complete IK chain should look like in the timeline.
Prepare for Animation
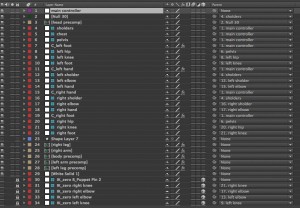
This is the process you’ll need to follow in order to get the main chunk of what needs to be done, allowing you to prepare for animation. Once you have each limb, let’s focus on the body and the head, and finally, connect them all together. Use the pin tool like before and place three pins, one at the pelvic area, chest area, and shoulder area. Next, add bones for those areas as well.
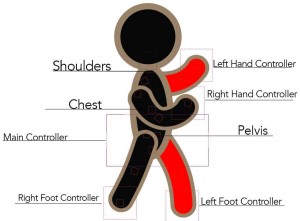
Now you should have three extra bones on the body. Take your left and right shoulder bones and parent them to the shoulder bone in the body, and take your left and right hip bones and parent them to the pelvic bone. Leave the chest alone. Now you will have to add two null objects (go to layer/New/Null). Name one “Head” control, and one “Main” control. You’ll want to place one somewhere near where the head meets the neck and body. This will be your head control parent, your head graphic to the head control null, and then the main controller null. What I like to do is make it slightly bigger, and place it somewhere around the pelvic area. Now all you have to do is parent all of your controls to this null.
So shoulder, chest, pelvis, left foot controller, right foot right foot controller, right hand controller, left hand controller, and head controller to main controller. Your full rig should look something like this in the timeline, and this in your comp viewer.
Conclusion
There you go—now you have a character rigged and you’re ready to go. If you want help cleaning up your timeline, shy guy (i.e. turn off the visibility of your layers) your layers that don’t need to be directly controlled, and give your controllers different colors in the timeline to help differentiate what is supposed to do what.
