
Google Tag Manager is a tag management system on your website or mobile application. With this in place on your site, you have the ability to track anything and everything—well within reason (no Personally Identifiable Information of course)! Before diving head first into the world of tracking, it is important to ask what should be tracked on your site. Asking this first can help you understand what questions you are trying to answer by gathering this data. Once your tracking plan is in place, you can start creating your account.
Let’s Create an Account
Follow these simple five steps to create your Google Tag Manager account.
- Create an Account.
- Enter Account Name and select a Country. I would suggest the Account Name be the name of your company. We will save the website url/application name for the container.
- Enter your Container name. For a website, I recommend entering your website url, (www.test.com), especially if you will be adding multiple containers under the account. The same would apply for applications.
- Select Where to Use Container to whatever best fits your needs. The available options are Web, iOS, Android, and AMP.
- Voila! You have an account. Upon creation, a prompt will appear with the code to put on the site. While a developer isn’t needed to configure a GTM account, a developer is needed to put the code on your site. For this part make sure you or your developer has access to your site that way they can add the code to the <head> and <body>.
Pretty painless so far. Now let’s get into the good stuff.
Tags, triggers, and variables…Oh my!
These three components work together to control how we are sending the data and what we are sending within the data. Let’s break these down into digestible pieces before we create our first tag.
Tags
Tags tell us what data we are sending and where we are sending that data. Depending on the tag, our data can go to third parties like Google Analytics, Google Ads, and Floodlight.
Triggers
Triggers tell us when and where our tags should fire on our site. Examples of triggers are events that occur on the page like page views, link clicks, or form submissions. It is possible for a trigger to fire once, several times, or never.
Variables
A variable tells us a certain value. Variables can be used to dynamically populate data for triggers and tags although they are not necessary for either.
Let’s create our first tag
For this example, we will create a Google Analytics tag for our site.
Under Tags, click ‘New.’

This will pull up the settings for our tag. Select what type of tag we want. We can do this under ‘Tag Configuration.’ For this tag, we will just need the ‘Google Analytics – Universal Analytics’ tag.
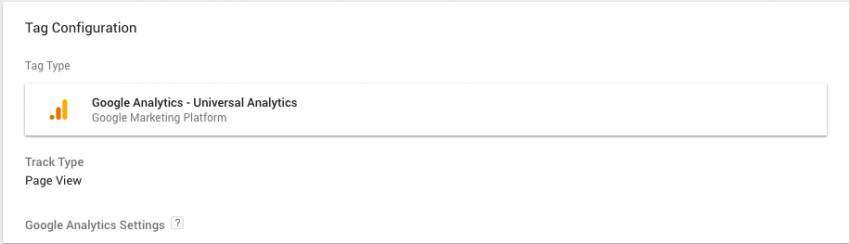
Within the tag itself are some settings we will need to provide information like Track Type and Google Analytics Settings. For Track Type, we will select ‘pageview.’ For Google Analytics Settings, we will create a new variable which will contain our Tracking ID. We can declare this once in our container and reuse it for all tags that need it. The final piece of the puzzle is telling this tag where to fire using a trigger. In this case, we want our tag to figure on every page of the website, so we will use the default ‘All Pages’ trigger.
The last step before adding the code to your site is to publish the container.
How to check if it is properly installed?
Google created the Tag Assistant browser extension to do just this. This browser extension checks what third party tags are currently on your site. It displays useful information like how many tags there are, what kind of tags they are, and whether or not they are correctly installed.
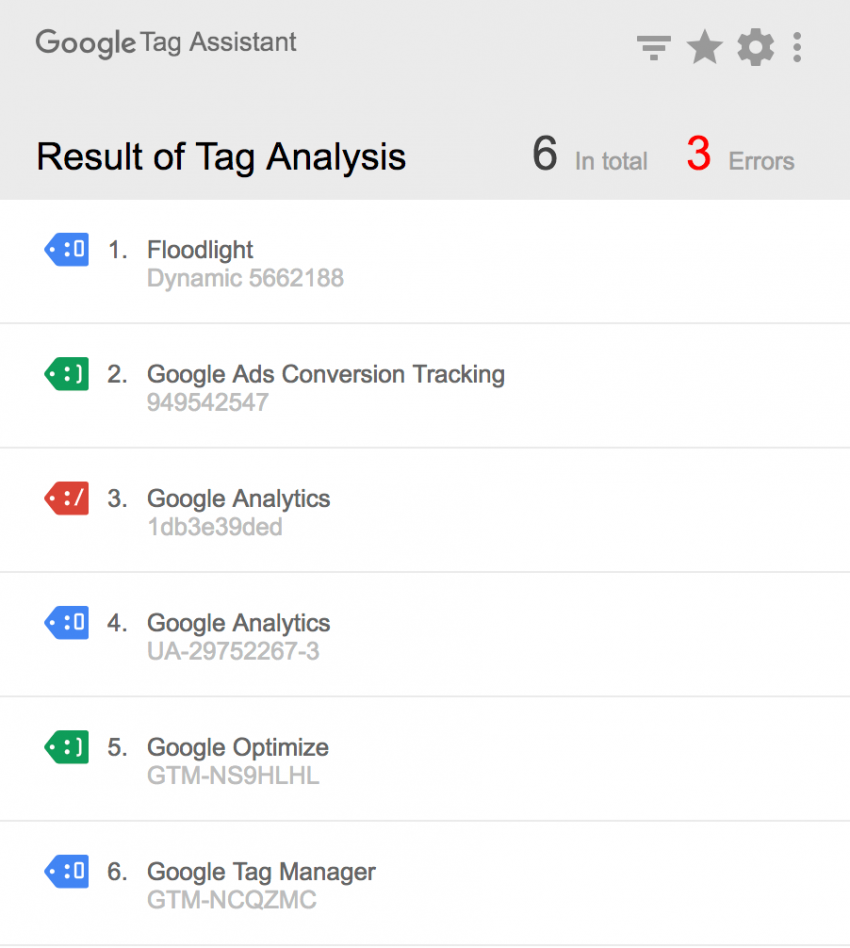
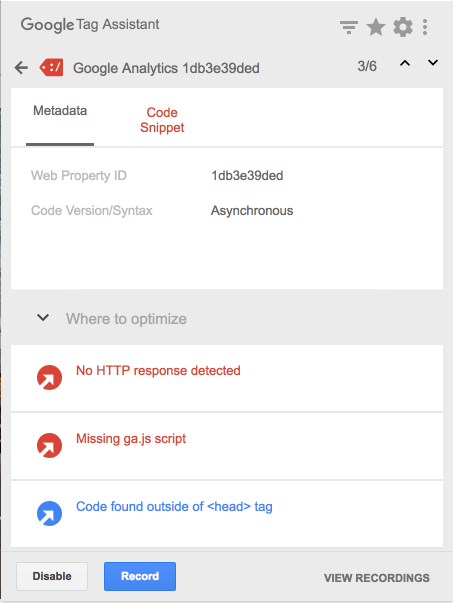
I stumbled upon this website that wrongly configured their tags. Not only does Tag Assistant clearly labels what tags are causing the issues, red and blue tags, but also gives the user a list of what they can optimize to ensure more accurate reporting.
Once you confirm that your tags have been properly placed on your site, you should see the data start to roll into your Google Analytics account. Not so fast though, you will need to wait 24-48 hours for this data to process into your Audience, Acquisition, Behavior, and Conversion reports. Luckily for those of us that are impatient, there is always the Real-Time report.
Debugging made easy
Google Tag Manager makes debugging easy and convenient with its preview feature. This debug pane will display tags that have yet to be published so you can flush out any issues with those new tags, triggers, or variables. Once enabled, you will see the debug pane appear at the bottom of your site. Only you will be able to see this pane, so your users can continue on your site without any interruption. While debugging, no data will be affected until you submit your current workspace. Once everything is in place, you can publish your current workspace.
Let’s breakdown the components of the debug pane:
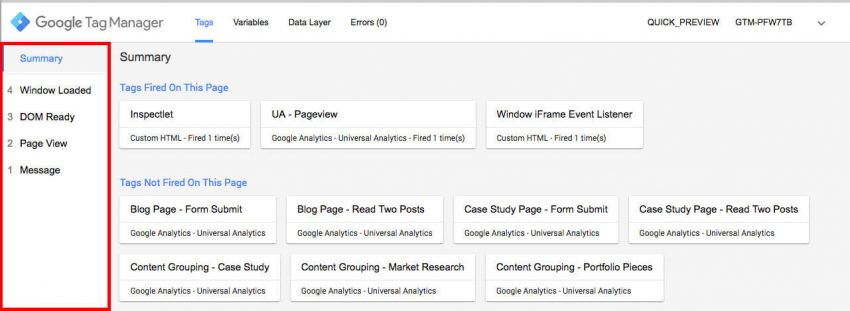
On the left are the messages that have occurred on the page. On initial page load four messages will appear, Message, Page View, DOM Ready, and Window Loaded. For every new message fired, it will appear in the section in descending chronological order. You can click into these individual messages to see what data is associated with it.
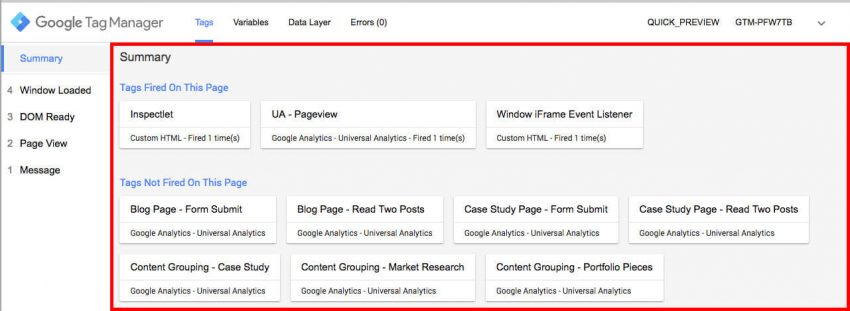
On your right, data associated with the message will appear. Above this area, you have the ability to switch tabs to see other data like Variables, Data Layer, and Errors. By default, tags will display. The tag section displays all the tags in the container and sorts them into two distinct groups, tags fired on the page and tags not fired on the page. If a tag is fired, the tag will move up from the not fired to the fired section and vice versa.
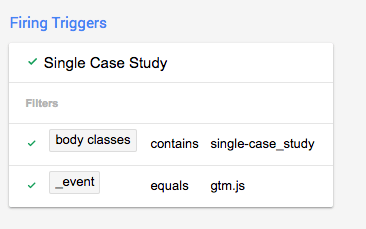
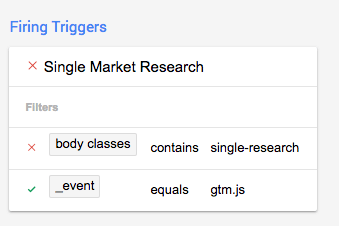
Now we can see when a tag is firing but it doesn’t tell us much as it to why it did or didn’t fire. Clicking into the tag gives us valuable information like the properties, messages where this fired, firing trigger, and blocking triggers.
We are going to examine the Content Grouping (Case Study and Content Grouping) Market Research tags from the above example. When we navigate to an individual case study page, we will see that the case study tag has fired while the market research tag has not. When we click into the tags, we will see that they have different firing triggers. The firing triggers consists of criteria that must be met in order to fire. If one of these firing triggers fails, it will not fire. Whether or not the criteria is met is indicated with the green checkmarks and red crosses. If we need to make adjustments to our trigger, we can quickly reference the trigger’s name as it is located above the filters, i.e. Single Case Study and Single Market Research.
Before we get carried away with all the exciting tracking capabilities available in GTM, it is important to remember to stay true to your tracking plan. Just because we can track something does not mean we need to track something. Exhibiting restraint during tracking will not only save you time but the headache of sorting through the unnecessary data. While this barely touches the surface of what is capable in Google Tag Manager, it provides you with some familiarity, so you can start creating your own tags, triggers, and variables. Happy tracking!