
Front-end development has changed a lot over the years. User interfaces (UI) have evolved from a simple template with text and buttons, to animations and colors which pull the user’s attention and gives the site the flexibility to behave in different ways.
As a developer, sometimes I need tools that are meant for specific situations, but in other instances, I need more code flexibility to provide the best experience possible to end users that will be managing content and settings. In this article, I’ll talk about a front-end framework that’s flexible and useful for processing dynamic information, Vue JS.
Unlike other monolithic frameworks that are designed for a specific behavior, Vue JS is designed from the ground up to be incrementally adaptable, making it pretty awesome when you adapt an existing site with it. The core library is focused on the view layer only, and is easy to pick up and integrate with other libraries.
History
Vue JS was created by Evan You, a developer who worked at Google using Angular. After some time with Google, he had the idea of creating a front-end framework that could be as powerful as Angular, but at the same time, “lighter” and flexible, without all the unnecessary plugins and concepts that Angular had by default.
“Vue.js is a more flexible, less opinionated solution (than Angular). That allows you to structure your app the way you want it to be, instead of being forced to do everything the Angular way. It’s only an interface layer so you can use it as a light feature in pages instead of a full blown SPA” – Evan You
The first version of Vue JS was released in February 2014. By March 2018, it now has two major versions.
Now, where can I use Vue JS?
The capability of Vue JS goes from a SPA (Single Page Application) to large-scale websites with databases and different kinds of structure, making it a wide spectrum framework. With this framework, you can easily create components that will work everywhere. Meaning, I can include the behavior I need without anything else in my code (Thanks Evan!).
Vue JS has several libraries that complement its functionality. One of the most commonly used is Vuex, which is a state management pattern / library for Vue JS applications. Its job is to be a centralized store for all the components for the application. It has several rules that ensure that what you specify on a component doesn’t depend on anything else but the component itself.
Why use Vue JS?
Vue JS is easy for most developers to jump into, as this framework is made of JavaScript. Anyone that has basic JS knowledge will be able to develop with Vue JS.
What I love about this is the fact that Vue JS is a great creation tool. It’s set up with some functionality, but lets you build code with a DIY logic and structure. Nothing is set in stone, so it can be easily escalated to whatever you want to create, much like a bunch of LEGO sets that you can combine.
The real-time functionality that was popular on the Angular framework is applied on Vue JS too. It’s easier to apply with a simple directive (which is a special attribute on HTML tags for Vue JS) with a value in the Vue app, this is one of the basic functionalities of Vue JS.
There is an official guide for using Vue JS. This guide assumes intermediate level of knowledge with HTML, CSS, and JavaScript. If you don’t feel comfortable with this knowledge, it might be a good idea to learn the basics first. As always, learning the basics leads to a good future learning process.
Using Vue JS
First of all, Vue JS is a free framework and open-source. Meaning, you’ll get help from a lot of people that have implemented it before. You can also contribute to the framework on GitHub.
When setting up Vue JS, you’ll be able to include it from a cdn link, with composer/npm/yarn or directly into your html file by using a script tag. Basically, you have a lot of options to include this framework in your project and use it as you consider which is the best option for you. To learn how to include it in your projects, turn to the Vue JS guide.
If you want to create a new application using Vue JS, you need to create a new Vue instance with the Vue class and pass in the element Vue will use as the root of the app. Vue will work inside this element and it won’t mess with your other code. Below is an example of a working Vue JS app.
JS file:
var app = new Vue({
  el: '#app',
  data: {
    message: 'Hi ho Silver!'
  }
})
HTML template:
<div id="app">
  {{ message }}
</div>
This is what you’ll need to have a working app display a message on your interface—simple, isn’t it? The properties that I set in this Vue example are the “el” variable that defines where the app will work (DOM element / HTML tag) and the “data” that will be used inside the scope. These properties are defined as a JSON object, which is pretty simple to understand.
Vue JS has a live listening state for every change that happens on the app. If you modify the value of the message variable, you’ll be able to see it change in the interface wherever the variable has been used. If you have this code working, try to change the message in your web browser console by typing app.message = “anything you like.”
Conditionals and loops
There will be some instances where you might need to iterate through an array, an object, or check if “x = 1.” For these situations, as in any other development languages, there are conditionals and loops for the templates.
The conditionals and loops in Vue JS are pretty similar to what you use in other coding languages, but the way they are used differs. They have the same logic with a few extra rules applied through Vue directives. These directives will be determined with a prefix “v-” that sets them as a Vue bind HTML attribute that works within the app scope.
To use these control structures, you first need to declare the app and variables that are going to be used (as I did in the previous example). After that, proceed to create the view structure.
var app = new Vue({
  el: '#app',
  data: {
    display: true,
    tasks: [
      { text: 'Learn JavaScript' },
      { text: 'Learn Vue' },
      { text: 'Build something awesome' }
    ]
  }
})
Let’s say you want to show an element on the page depending on the value of the “display” variable in the code. You’ll use an “if” conditional inside the HTML tag to confirm if it needs to be hidden or not.
<div id="app">
  <div v-if="display">
    <ul>
      ...
    </ul>
  </div>
</div>
The conditional is declared as the attribute “v-if” and the variable to evaluate is “display.” If the variable is truthy, it will show the block with its content on the view. If the variable “display” is changed to false, you won’t see that element on the view anymore. You can do a test with your browser console, setting the var to something falsey, like “app.display = false”, and vice versa.
Now, I want to list all the tasks of my app and I’ll use a loop to do so. This loop will be set as a simple “if” conditional and will print as many tag elements inside the array or object specified on the “v-for” directive.
<div id="app">
  <div v-if="display">
    <ul>
      <li v-for="task in tasks">{{ task.text }}</li>
    </ul>
  </div>
</div>
As you can see, I declared a “li” tag with a “v-for” directive. The value for this directive will be the array that was declared before in the app. The for loop acts as a normal “for” and will work the same as in any other coding languages. The syntax needs to be a single variable (task in this case) that will take the value of the elements inside the array it’s going through (tasks as declared on the app). Once you set the for loop, inside of it you can use the variable that’s defined on the loop.
As mentioned before, if you want to see how this would work in real time, you can set the variables of your app in your browser console, using “app.tasks.push( { text : ‘This is a new task’ } )” to add more elements to your array. This will automatically create a new “li” item for each time you enter a new value.
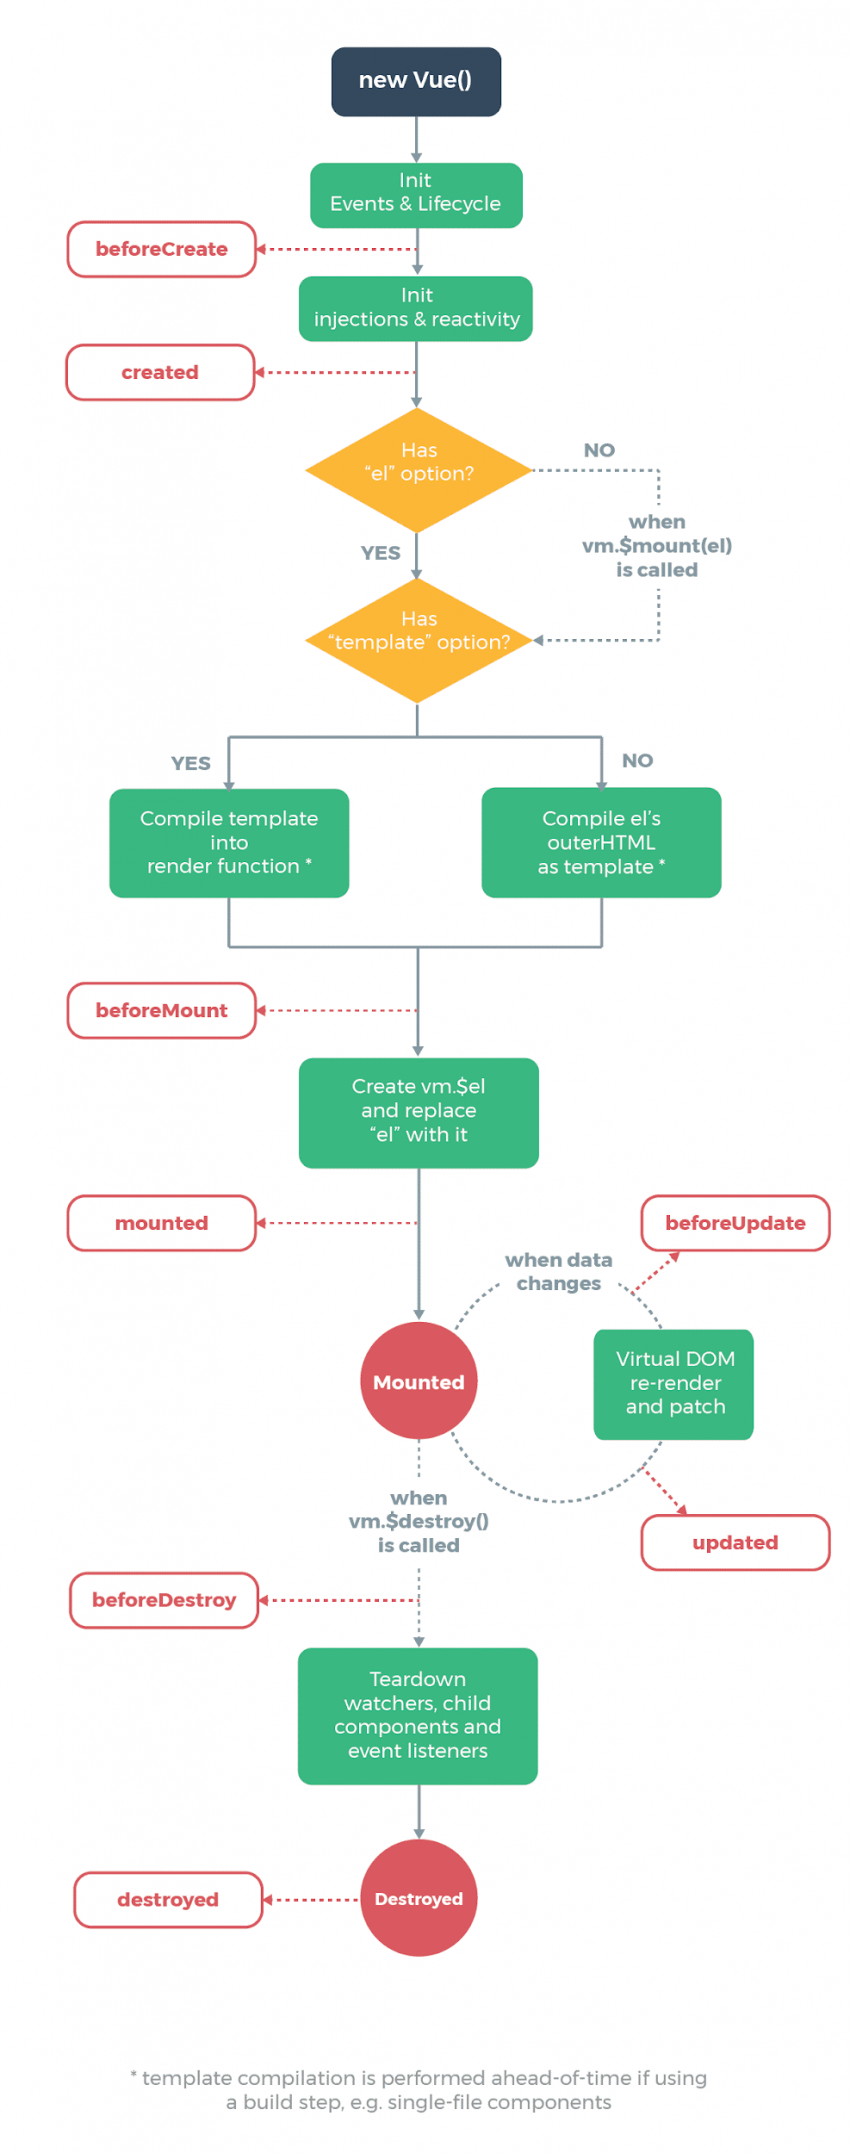
Instance lifecycle hooks
Creating a Vue instance triggers several states that are processed in a sequential way. These states can be used in different ways depending on the situation. These states are called lifecycle hooks. Vue has three main states: created, mounted, and destroyed; which have different hooks where you can trigger functions. The hooks are beforeCreate, created, beforeMount, mounted, beforeUpdate, updated, beforeDestroy, and destroyed. The next diagram will explain where the hooks are triggered and how they behave in the lifecycle of a Vue app.
Directives, custom directives, and shorthands
As shown in the first example, directives that are used with Vue JS have a prefix of “v.” But, this is not the only way to use Vue directives. There are different applications for different directives, depending on what you need to do. I’ve already shown v-if and v-for. If I needed to pass arguments to an attribute on the DOM, I would need to use v-bind.
Basically, the directive v-bind transforms a normal attribute of a HTML tag to a Vue JS directive, making the use of variables inside an attribute possible. An example of this could be an href attribute. To transform this normal attribute into a Vue JS directive, you need to put “v-bind:href=” as a prefix the v-bind directive.
As you can see, I used a “:” symbol to prepend the directive to the href attribute. This makes the use of variables that are declared on our app context possible. It’s worth it to mention that this directive has a shorthand. Just using “:” symbol as a prefix for any attribute will make it work as using “v-bind:.” Below is a better example of the use of this directive.
<a v-bind:href="url"> This uses the v-bind directive! </a>
<a :href="url"> This has a shorthand directive! </a>

var app = new Vue({
  el: '#app',
  data: {
    url: “http://www.google.com”
  }
})
The value set to url variable will be printed on the href attribute of both “a” tags. Again, if you change the value of the url variable, this will also change the value of the href attribute and every other variable in your context.
Another useful directive for Vue JS is the v-on directive. This one declares an action on the DOM element. You can set the directive to have different behaviors like click, submit, keyup, and more.
An example of this is v-on:click. This will detect a click on the element, just as the onclick attribute that can be set on a HTML tag. But, it will also give you the opportunity to modify the behavior of the event, such as stop, prevent, self, once, and others.
Like v-bind directive, this one also has a shorthand. The shorthand to this directive is with the @ symbol and is used as @:click. Below is an example of this functionality.
<a v-on:click="doSomething"> ... </a>
<a @:click="doSomething"> ... </a>
Because I always try to shorten my process in the code to make it easier to understand, I like to use the modifiers that I mentioned before. For example, if I wanted to prevent the default behavior of the “a” tag as with preventDefault() function on JQuery, I would use @:click.prevent=”doSomething.” This will cause the same reaction of the use of preventDefault() function on JQuery, with a more concise way to understand code.
Computed properties
Vue JS has a useful way to create custom methods you can use whenever you want. It comes in handy when you need to repeat a lot of small methods for formatting or changing values, or if you have a huge process that you want to trigger in certain situations. In-template expressions are very convenient, but they are meant for simple operations. Putting too much logic in your templates can make them bloated and hard to maintain. For example:
<div id="app">
  {{ message.split('').reverse().join('') }}
</div>
At this point, the template is no longer simple and declarative. You have to look at it for a second before realizing that it displays the message in reverse. For any complex logic, you should use a computed property.
<div id="app">
  <p>Original message: "{{ message }}"</p>
  <p>Computed reversed message: "{{ reversedMessage }}"</p>
</div>

var vm = new Vue({
  el: '#app,
  data: {
    message: 'Hello'
  },
  computed: {
    // a computed getter
    reversedMessage: function () {
      // `this` points to the vm instance
      return this.message.split('').reverse().join('')
    }
  }
})
You can achieve the same result by invoking a method in the expression.
// in component
methods: {
  reversedMessage: function () {
    return this.message.split('').reverse().join('')
  }
}
Instead of using a computed property, you can define the same function as a method. For the end result, the two approaches are exactly the same. However, the difference is that computed properties are cached based on their dependencies. A computed property will only re-evaluate when some of its dependencies have changed. Meaning, if the message has not changed, multiple access to the reversedMessage computed property will immediately return the previously computed result without having to run the function again. This means that there will be less execution time and memory waste.
Vuex
So then, what is a state management pattern? A state management pattern is a self-contained app with three parts:
- State: The source of truth that drives the app and handles the data and properties.
- View: A declarative mapping of the state. This will be the area that contains the template that you use for your app.
- Actions: The possible ways the state could change in reaction to user inputs from the view; in other words, methods, computed properties, and watchers.

Below is a simple example of a Vue app with this pattern.
new Vue({
  // state
  data () {
    return {
      count: 0
    }
  },
  // view
  template: `
    <div>{{ count }}</div>
  `,
  // actions
  methods: {
    increment () {
      this.count++
    }
  }
})
As you can see, I stacked the state, view, and actions of the app inside one component. This component can be assigned to a variable and used as an object. You can then change variables and use its methods as if it was any other JavaScript object.
This helps other developers understand the code better, making it easier to maintain. For more information, check out the site’s documentation.
My point of Vue (see what I did there?)
At Zion & Zion, we work with Vue JS on several of our projects. This framework allows us to develop something creative, new, and useful, which we love, as we’re always trying to innovate our projects with new technologies.
As far as I’ve used Vue JS, it has been very impressive. A few of my favorite features include the way you can organize your code and make it work as simple as adding one of your components, the scalability it has, the useful add-ons that make your SPA a great starting point for future larger sites, and the simple structure and learning curve. These are just a few reasons why you should implement Vue JS on your next project.
Of course, there are a lot of add-ons and processes that I didn’t get to in this article. If you’re interested in learning Vue JS, there are many tutorials and documentations already on the web that can help you easily figure out how to apply it to its max. So, it’s time to do some research and enjoy the power of Vue JS.