WordPress Installation Guide
WordPress is a powerful tool that allows you to easily get a website up and running without having to know a lot of the technicalities. Its audience is unrivaled in size – from fortune 500s to the humble hobbyist. Today, we’ll walk through the steps you need to know to get your WordPress site up and running.
Preparing WordPress
First things first. You can’t very well install WordPress unless you have a place to put it. Hosting is the answer here. A hosting service gives you a place in the web-o-sphere that is accessible to anyone with an internet connection. All websites have a hosting provider, and there are many to choose from. So do your research, shop around, and pick a hosting provider that will meet the requirements you need for your website. I’ve included a small list of hosting providers that support WordPress websites at the end of this article for your convenience. For the purpose of this article, I’ll be using a hosting provider that supports /cPanel, a software platform that runs on the majority of hosting providers that allows you to easily manage your hosting account.
Once you’ve signed up for a hosting provider, it’s time to download WordPress. Jump over to /wordpress.org to download the latest WordPress files. WordPress changes their website on occasion, so look on the website for a big button that says “Download WordPress.” At the time of this writing, the button says “Download WordPress 3.9.1.” This should initiate a download of a /.zip file. This file holds all of the needed assets for WordPress to run. Now, what to do with said .zip file?
Uploading WordPress to your Hosting Provider
Once you have your .zip file downloaded onto your computer, it’s time to transfer it over to your hosting provider. Login into your hosting provider and let’s transfer the .zip file onto your website.
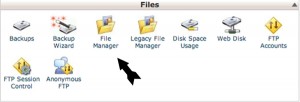
As stated, we’ll be using cPanel throughout this tutorial. Some hosting providers differ in their account management software, but the steps should be fairly similar for your system. In cPanel, click on “File Manager” under the “Files” section. See the screenshot.
Once clicked, you may be prompted to choose a directory to manage. The default item in the prompt is your web root, or more clearly, the place that the rest of the world sees when they come to your website. This is definitely where we want our files, but we also want to be able to view special “hidden files.” So click the checkbox next to “Show Hidden Files,” and then click “OK” to be taken to the file manager for your website root directory.

Remember that .zip file we downloaded from /WordPress? We’ll now upload that file to our hosting provider. Click on the “Upload” button in the upper right corner of the File Manager—see the screenshot.
We’ll be brought to the “upload” page where we are presented with a few options. Click on the “Browse” or “Choose File” button and select the .zip file. Since we downloaded it, it will more than likely be found in your default “downloads” directory. For Windows, that directory is located in your “Documents” folder. For Mac, it’s located in your personal User folder. Select the file, and click “Select.” Once done, you’ll notice that the file is automatically being uploaded to your hosting provider via a loading bar in the bottom right of your screen. When it says “complete,” you’re safe to close this window to return to the file manager window.
Unzipping WordPress

You’ll see now that the zip file is shown in the list of files of the file manager. We want to extract all of the .zip files’ contents so our hosting provider can use them to show our visitors a WordPress website. To do this, click on the .zip file to select it.
Now click on the “Extract” button. You’ll be presented with a prompt asking where the files should go. Click the “Extract File(s)” button to extract them to your website root directory. When it’s finished, File Manager will show a list of all the files that were extracted. Click the “Close” button on this dialog to see the files.
You’ll notice we have a new folder called “wordpress.” Inside of it is everything that makes up WordPress. Unfortunately, it’s all in the wrong spot. As it is, anyone coming to the site would need to go to “yoursite.com/wordpress” in order to see it. We want them to be able to go directly to “yoursite.com.” Let’s get this fixed by moving everything out of the WordPress directory and into the website root directory.

Double click on the “wordpress” folder to move into it. Click the “Select All” option above the list of files to select everything in the folder.
Now, right click on the selected files, and choose “Move” from the menu that appears. A dialog box will appear asking where we’d like to move our files to. At the bottom, remove “wordpress/” from the end of the text that is displayed in the text box and click “Move File(s).”
Our files are now officially in the right spot in our hosting provider. We can safely close this window and finish up our preparations by setting up the database.
Setting up the Database

WordPress needs a place to store your website. All of your blog articles, page text, images, and settings are stored in a database for WordPress to access, grab, put, and change whenever it needs to. Let’s set one up by moving back to our cPanel and clicking on the “MySQL Databases” button under the “Databases” section. Creating a Database
From here, type in a name for your database, such as “wpdb” (for WordPress database) into the text box labeled “Create New Database.” After typing in your database’s name, click the “Create Database” button. Once the database has been created, you’ll be shown the final name of your database with your username prepended to it. Write this down; we’ll need it later.
Creating a User
Now we need to create a way for WordPress to access the database. We’re going to create a user that has access to our database. Click the “Go Back” button to return to the MySQL Databases and look for the section labeled “Add New User.” From here, in the first text box shown, type a username for WordPress to use. Something like “wpuser,” then add and confirm a password for the user in the following two text boxes. Click “Create User,” and you’ll be shown the username and the password. Write these down since we’ll need them later. Finally, click “Go Back” to return to the “MySQL Databases” page.
Connecting the Database to the User
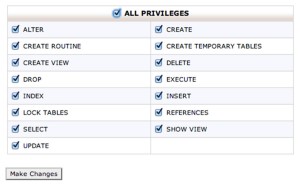
Now we have a database, and we have a user. But the user we created has no idea the database exists, and the database has no idea the user exists. We need to let the user access the database in order to store stuff in it. To do this, we look under the last options on the page—the “Add User to Database” section. Here, we’ll select our new username from the first dropdown, the database from the second dropdown, and then click the “Add” button. From here, we’ll be presented with a list of privileges we want the user to have with our database. Click the “All Privileges” checkbox to give full access to the database and then click “Make Changes.”
Once complete, the hard part is over. The next step tells WordPress what its new database user is, what the database is called, and how to access it.
Telling WordPress Its Username and Password
WordPress needs to be able to connect to our database by using the username we just created. In this step, we’ll tell WordPress how to log in to our database to make changes.
Creating the Configuration File
Let’s head back over to our “file manager” by going to our cPanel and clicking on “File Manager” from the “Files” section. Next, click “Go” from the dialog box that appears.
WordPress keeps all of its special and private information in one file called “wp-config.php.” This file holds everything WordPress needs to connect to the database, including how to secure its username and password, and how to set itself up as a website. The people who helped create WordPress have supplied us with an example wp-config.php file to start with. It’s called “wp-config-sample.php.” Find this file in your list of files, and right click on it. Click on “copy” from the menu that appears. A dialog will appear asking you to tell cPanel where to copy the file to. Add “/wp-config.php” in the text box at the bottom of the dialog box, and click the “Copy File(s)” button.
Now, right click on your new “wp-config.php” file, choose “code edit,” then click the “Edit” button on the dialog that appears.
Telling WordPress the Database Name
It might look a little scary, but don’t worry, what we’re about to do is pretty simple. Find the line that says “define(‘DB_NAME’, ‘database_name_here’);.” For the version of WordPress I’m using, it’s line 19 (as indicated by the strip of numbers on the left of the screen). It should be the first line in the file that has colored letters. Replace “database_name_here” with the name of your database that we created earlier. If you followed my earlier suggestion, it would be your account name followed by “_wpdb.”
Telling WordPress the Username
Now find the next colored line that says “define(‘DB_USER’, ‘username_here’);” (line 22 for me), and change “username_here” to whatever username you created earlier. If you followed my earlier suggestion, it would be your account name followed by “_wpuser”.
Telling WordPress the Password
The final piece of information WordPress needs to know about the database is the password. Find the next line of colored text that says “define(‘DB_PASSWORD’, ‘password_here’);” and replace “password_here” with the password you chose for the database user earlier.
Securing the Information
Now that WordPress has the information, it needs to have a way of securing the information to keep it from getting into the wrong hands. To do this, WordPress uses a bunch of random characters as a way to encode and decode the password whenever it needs to use it. Skip a few lines until you see “define(‘AUTH_KEY’, ‘put your unique phrase here’);.”
For my version of WordPress, it’s line 45. Notice that there is a grouping of these, about eight lines that look really similar. We’re going to replace each one with something random. WordPress offers a tool we can use to generate these random characters for us. First, erase these lines of code since we’re going to replace them. Then open a new browser window, and go to this website: https://api.wordpress.org/secret-key/1.1/salt/. Copy everything on that page, and paste it into your wp-config.php file where you deleted the old lines of code. Now WordPress has a way to secure its username and password.
Save your changes by clicking the “Save Changes” in the upper right corner of the screen. You can safely close the window to return to the File Manager.
Installing WordPress
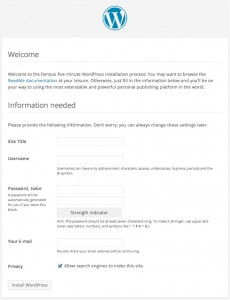
We made it passed the hard part. The beginning preparations were really technical, but from here on out it’s smooth sailing. Close out of cPanel and go to your website.
Pretty good feeling, isn’t it? If you see this page, you can be sure you’ve done well so far. If WordPress gives you any prompts, backtrack to those areas and correct any mistakes you might have made. If you don’t have any prompts, then it’s safe to proceed. The form presented to you is how you set up your personal login information for your website. You’ll give your site a title, then give yourself a username, a password, and tell WordPress your email address. Remember this username and password, as you’ll be using it from now on to log into your special area of your website. When you’re done, click “Install WordPress.”
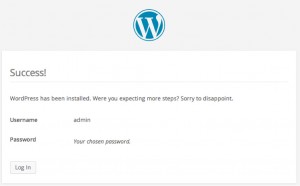
Once you do, you’ll be presented with a new page that lets you know WordPress successfully created your username and password.
Click the “Log In” Button.
This is your login page. Any time you want to make a change to your website, you’ll go to this page. It can be found at “yourwebsite.com/wp-login.”
Conclusion
It may seem like a lot of steps, but once you get through it one or two times, you’ll realize how incredibly quick it is to get a site up and running. WordPress boasts about its “five minute install,” and it really is true. If you come across any snags, checkout the /WordPress codex, read up on the official /WordPress Installation Tutorial, or ask someone on the /WordPress support forum, and it shouldn’t take long before you’re up and running with your very own WordPress website. To learn more about WordPress, read what my coworker here at Zion & Zion, Raul Salido, has to say about why you need a WordPress site.
