
You’ve likely found yourself staring at this article because you’ve looked at your development process and had a “There’s got to be a better way!” moment.
Whether you have a form of Continuous Integration or something less involved that doesn’t require automated testing, you’ll eventually have to decide on how your team deploys new code into staging and production.
Lately, at Zion & Zion, we’ve been doing a lot more development with Nuxt. Nuxt is a Javascript framework powered by Node and Vue. You can choose between single page applications (SPAs), universal server-side rendered applications, or even statically generated / pre-rendered applications. Each type has their own set of strengths and weaknesses, but each of them share one common step—the build process. The code samples you’ll find in this article are for deploying a Nuxt 2.x application from a BitBucket repository to Heroku hosting.
When using Nuxt, your project files will have to go through a build or generate process in order to prepare site files for use. During this process, your routes are generated, and all of your client-side and server-side files are compiled and compressed by Webpack into smaller bundles for quicker load times. This adds an additional level of complexity to our deployments as we will be required to run a CLI command immediately after deployment to begin the build process. Luckily, BitBucket and Heroku have us covered and give us the ability to handle this automatically from a properly established pipeline.
BitBucket Pipelines For The Win
There are only a few moving pieces to establishing a working BitBucket pipeline. You have a configuration file that tells the pipeline exactly what you want it to do and a few configuration variables set on your BitBucket repo that tells it where it’s going and how to authenticate with your host. That’s…about it.
Heroku has a pipeline solution as well, which works very similarly. The benefits and setup time are about the same as BitBucket pipeline except for one very big factor. BitBucket pipelines can be set up to clone your repo, download all your dependencies, and make sure your build succeeds without errors before ever attempting to deploy it to your host. We’ve all had something unexpectedly fail to compile for some reason and the worst time for that to happen is while you’re attempting to deploy. This does increase your deployment time because you’re essentially going through the entire process twice but adding a few minutes to a deployment far outweighs the ramifications of having something go awry in production. It is for this reason we also decided not to deploy using Heroku CLI.
Let’s Begin
1. Create Staging And Production Servers On Heroku
You’ll want to start here because we’ll need to use the names of your applications in the following step. Heroku’s admin portal is one of the best in the business so after a few clicks, you should be on your way.
2. Create And Configure Your BitBucket Repo
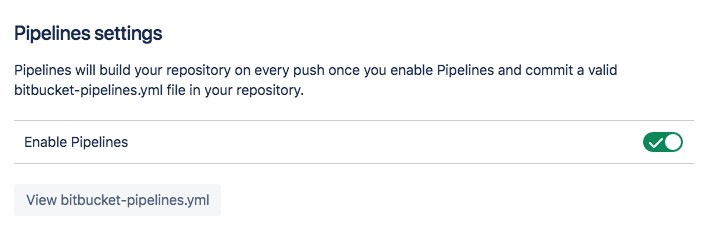
A.) Enable Pipelines for this repository (BB Repo > Settings > Pipelines > Settings)
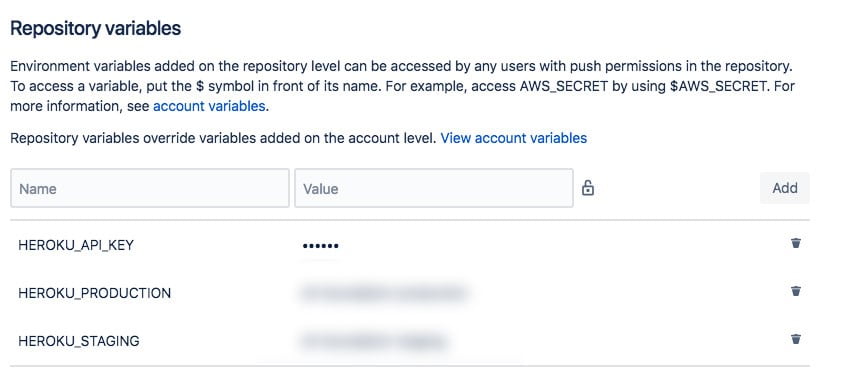
B.) Set up Repository Variables (BB Repo > Settings > Pipelines > Repository Variables)
This area allows you to establish values for variables used further in the process. For this example, these variables are necessary in order to establish a connection between BitBucket and Heroku. Take note of the little lock icon next to the Value field. Click that before you create a new variable you consider to be sensitive. You can see from my screenshot below that I did that for the HEROKU_API_KEY.
3. Set Up Your BitBucket Pipeline Config File
At the root of your project you’re going to create a new file named “bitbucket-pipelines.yml”. This file will contain all the instructions BitBucket will use to establish a pipeline.
bitbucket-pipelines.yml
# This script depends on two environment variables to be set in Bitbucket Pipelines
# 1. $HEROKU_API_KEY - Local environment var that contains your Heroku account's API key
# 2. $HEROKU_STAGING - Local environment var that contains your staging app name in Heroku
# 3. $HEROKU_PRODUCTION - Local environment var that contains your production app name in Heroku

 image: node:10.14.1

 # Doing a full clone to be able to push back to Heroku.
 clone:
   depth: full

 pipelines:
   branches:
     # When code is pushed to the staging branch it is deployed automatically to the staging environment.
     staging:
       - step:
           caches:
             - node
           script:
             - npm install
             - npm run build
             - git push -f https://heroku:$HEROKU_API_KEY@git.heroku.com/$HEROKU_STAGING.git staging:master
     # When code is pushed to the production branch it is deployed automatically to the production environment.
     production:
       - step:
           caches:
             - node
           script:
             - npm install
             - npm run build
             - git push -f https://heroku:$HEROKU_API_KEY@git.heroku.com/$HEROKU_PRODUCTION.git production:master
So, let’s break down the configuration here. We tell BitBucket what version of node we want to use, we tell them to do a full clone of the repo because that’s what Heroku requires, and we tell it to do so when there are pushes to branches named “production” and “staging.”
- “npm install” will install all of the packages listed as dependencies from your package.json file
- “npm run build” is a Nuxt command also defined in package.json
- “git push…” if no error occurs we tell BitBucket we’re ready to push to Heroku.
- A “heroku-postbuild” command defined in our package.json tells Heroku to run the same build CLI command that we just tested
4. Deploy And Watch The Magic
Once everything’s been configured and tested, you can push an update to either the “staging” or “production” branch and watch BitBucket take it from there.
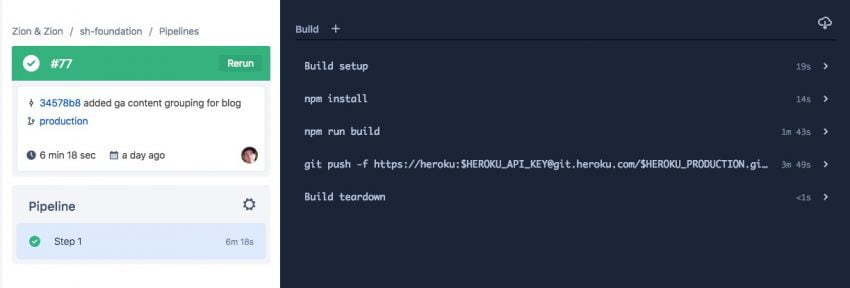
The above screenshot shows all the steps involved in deploying your code to Heroku. Each step can be expanded to reveal all the logs surrounding the actions taken. If an error did occur, you’d be able to see what caused it.
BitBucket also stores the entire deployment history for all tracked branches to give your development team the visibility it needs.

Conclusion
You have a lot of options when it comes to setting up Continuous Deployment. Finding the right solution for your team can take a decent amount of research as well as some trial and error. For us at Zion & Zion, this works pretty darn well. At the cost of about 10-15 minutes of set up, you get an automated process that your entire team can use that is safe, reliable, and worry-free.