When you are designing a website, images, whether graphics or photography, have a huge impact on the user experience. They can also be the deciding factor as to whether someone is going to stay on your site or move on to a competitor’s. Images can be a powerful communication tool that transforms a simple site into a memorable experience for your audience, amplifies your brand, and increases conversions. Images can often also be the most direct way to educate your users as different types of people process different types of information. For example, an infographic can visually communicate the same idea as a paragraph of text, and can put less stress on the user as it doesn’t require as much work for the user to consume and comprehend the information.
With all of that being said, it is important to know how to properly prepare an image for the web. Properly formatting images for the web requires choosing the right file format, image resolution and file size, plus additional factors that we will discuss below.
The difference between following the steps below and ignoring them can be anything from losing site visitors due to a slow loading page, to having negative SEO consequences due to not formatting images to the best of your ability (deemed bad by Google).
When to Use Images
Although images can be influential with your audience, it’s important to choose images that have purpose and relate to the content you are presenting. We naturally want to fill in any white space with images but need to be wary of overusing images. Placing a filler image on the page that has nothing to do with the messaging does not help your user and can often times be detrimental to your brand.
Jakob Nielson, a web usability consultant, conducted an eye-tracking study to research how users interacted with images on webpages. In the study, he and his team discovered that users ignore images that had no purpose on the page and were “purely decorative.” (https://www.nngroup.com/articles/photos-as-web-content/)
Use your best judgment, be selective and only use images and graphics to enhance the content and the brand when it makes the most sense. If you feel the page is lacking excitement and your first thought is to add an image, think about the end goal for the user and ask yourself if it’s really necessary, or if there is an alternative solution.
Additionally, make sure you have the rights to any and all images on your site before you use them. If you do not have custom photography or your client does not have the budget for a photo shoot, you should consider searching for stock photography. Though beware, even with these websites, some of the images have usage limitations so make sure you are purchasing the correct license. Here are a few stock websites that are well known:
Be careful to avoid using something generic when purchasing stock photography; you want to convey the right brand personality to your audience and unfortunately, the more generic the photo is, the more likely it is that someone else is probably using the same photo in their marketing materials.
What File Format Should I Use?
There are multiple file formats to choose from when it comes to exporting your image for the web. Each has different properties that will compress the file differently that will affect the outcome of the image. This is why it’s important to understand them all and know which one to use.
There are two compression terms that we should define before going into each one:
- Lossy (or irreversible) Compression: This method uses inexact approximations and partial data discarding to represent content. So your original file can never be restored in order to reduce the data size.
- Lossless Compression: This method keeps the original data even after the file is compressed, allowing you to restore your original file even after you have compressed your image.
Below is a list of the different formats you have to choose from when exporting images for the web:
JPEG
This image type is lossy, and you have complete control over the compression level in Photoshop.
JPEGS do not have the ability to export with a transparency so if you export something that does not include a background it will automatically be filled in with white.
Works best for: Images that contain millions of colors like photographs, drawings, images with gradients, any digital image, etc.
GIF
This image type is lossless and a bitmap, which means it’s a grid made of tiny pixel squares. This format does allow pixels to be transparent so if you save something without a background, you are able to place it over any graphic without a white box showing up around your GIF. GIFs are also able to contain more than one frame so a lot of times designers will use this feature to create animated graphics. This format works best with images that contain less color and more text such as charts, small graphics, or images with text.
Works best for: Images that contain less color and more text such as charts, small graphics, or images with text.
PNG
This image type is lossless and there are two types of PNGs to choose from. The first type is an 8-bit, which can store up to 256 colors. The second type is a 24-bit, which can store millions of colors and has the ability to export with transparency.
Works best for: Images with a transparency or fade.
Saving for Web
Once you have your image ready, these are the options you’ll need to adjust when preparing to save for the web.
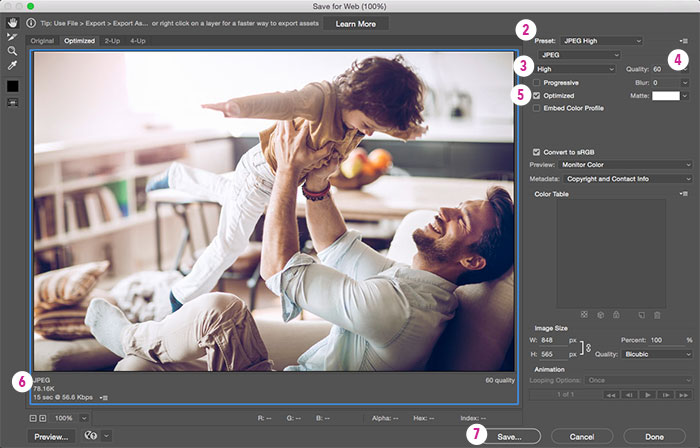
- To get started, in Photoshop select File > Save for web. You will see a preview of the image, which will adjust when you change each setting.
- Under the Preset field, you will choose the best format for your image. For this example, we will use a JPEG.
- Next, choose quality level. This is where you can play around with the different options to see how each change affects the image quality. For images with a lot of detail, I generally have to keep it at the High setting, then run it through an additional compressor. (Don’t worry, I’ll cover this in a few paragraphs.)
- You also have the option to adjust the Quality slider, which gives you more control and you can be very precise about with the number you would like to export it out at.
- You can select Progressive or Optimized. By default if you unselect Progressive, then Optimized will be selected.
Progressive images are recommended for web as they provide the best user experience. Rather than loading from top down, line by line, like normal optimized images do, risking the possibility of showing the user a white box before the image begins loading in, Progressive images default blurry and as they finish loading, get clearer and clearer.
- Check the estimated file size and load time in the lower left corner, and decide if the quality of the image is good enough to use.
- Once you are satisfied with your settings and the overall look of the image, click the Save
Don’t forget– once you have exported it out at a specific size you can never make that image larger without sacrificing quality. This is not an issue if you decide to make it smaller.
Image Optimization Saves Lives
The amount of time a user has to wait for images to load on a website dramatically affects their overall experience and opinion of your brand. We’ve all experienced waiting for a slow site to load, you might even try and refresh a few times, but if the site does not load quick enough you will either sit there in frustration or leave. Jakob Nielsen did a study and determined that there are three time limits to be aware of when you are optimizing your website performance. From this study, it was discovered that 10 seconds is the average time limit you are able to keep the user’s attention (https://www.nngroup.com/articles/response-times-3-important-limits). If you do not optimize your images correctly, it will result in very slow loading times on your website. You need to be conscious of how much you are able to optimize without sacrificing quality.
Once you have saved your file for web, you should run the image through an additional compressor to double check that you have the smallest file size possible for your image. Below are some great websites that offers this as a free tool. I would suggest doing your own research and finding the one that works best for you.
Size Matters
Even after you save for web and optimize your image, you should always check to see how large your file is before you upload it to your website. This is going to dramatically affect the load time of the page. Even though technology is getting better, you still need to take into consideration your audience with a slower Internet connection, with an old computer, or tthose who are accessing your site from their phone.
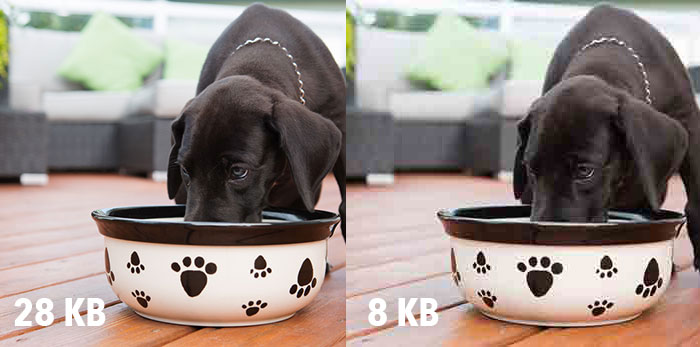
As I mentioned in the previous section, as you decrease your file size, the quality will also decrease. It’s up to you to determine the best compromise between the two. The images below were both exported as jpegs. Even though the image on the left is 20 KBs larger in file size, it will still load quickly enough to not take away from the user experience. Comparatively, the image on the right, although much smaller, has a lot of pixilation that could distract the user and negatively impact their experience.
Smaller web graphics should be 100k or less, while the larger images should be under 1MB. Something to consider when setting up your image is that while printed images should remain at 300 dpi or higher, most computer monitors will only display at 72 dpi. This means that there is no benefit to keeping your image above that resolution. Also, you should know the dimensions of your image before you save for web. If it’s only going to be displayed with a width of 600px, if you save it out with a width of 800 pixels, you will have a larger file size with no added benefit because the quality would be the same either way.
What This All Means
Images are a great visual tool to use on your website, but if you do not save out or optimize your file correctly, there are a number of issues that could result from it which could be detrimental to your brand.
Resources:
https://www.nngroup.com/articles/photos-as-web-content/
https://www.nngroup.com/articles/response-times-3-important-limits
/http://www.jimdo.com/2014/07/22/web-graphics-for-beginners-a-best-practices-handbook/
/http://mailchimp.com/resources/email-design-guide/
/http://www.creativebloq.com/design/designers-guide-image-compression-10121068