
Communication is one of the most important aspects of being an effective event planner. Without the communication aspect, your event plan will likely fall apart into a crumbled mess. Communicating is just one piece of the puzzle in terms of running a successful event. There’s scheduling and ordering food with the caterer, locking in the time and day of the venue, ordering decorations, securing tables and chairs, the list goes on. Worrying about your event email communication is likely the last thing you want to think about in the final hours leading up to your event.
In this article, I’ll explain how Marketo can help alleviate your stress and automate your event communications from the initial email invite all the way through the final communication of thanking the attendee for attending your successful event.
What is Marketo?
Marketo is a marketing and lead management solution that empowers marketers and businesses to communicate and create marketing assets such as emails, forms, and landing pages, which help move prospects down the sales funnel towards a conversion of sale. Marketing automation platforms such as Marketo help businesses do this at a much more efficient and effective rate than traditional methods such as excel sheets and basic communicating tools.
Within Marketo, there is an event app that helps marketers manage event leads and communications through an organized systematic approach that’s easily scalable across all event sizes. This ultimately saves time for the marketer and money for the organization. Many organizations put together at times dozens of events within one month across all their business units and locations. Having the ability to scale your event communications across all those events and staying completely organized is crucial to not only your success, but also your sanity.
In this next section, I’ll uncover the basics and features that are necessary for deploying a successful event communications plan. I will discuss features that are exclusive to Marketo and are designed to help save you time during the initial setup phase. Master these features, and you’ll be on your way to becoming a Marketo event specialist.
What is an Event Program?
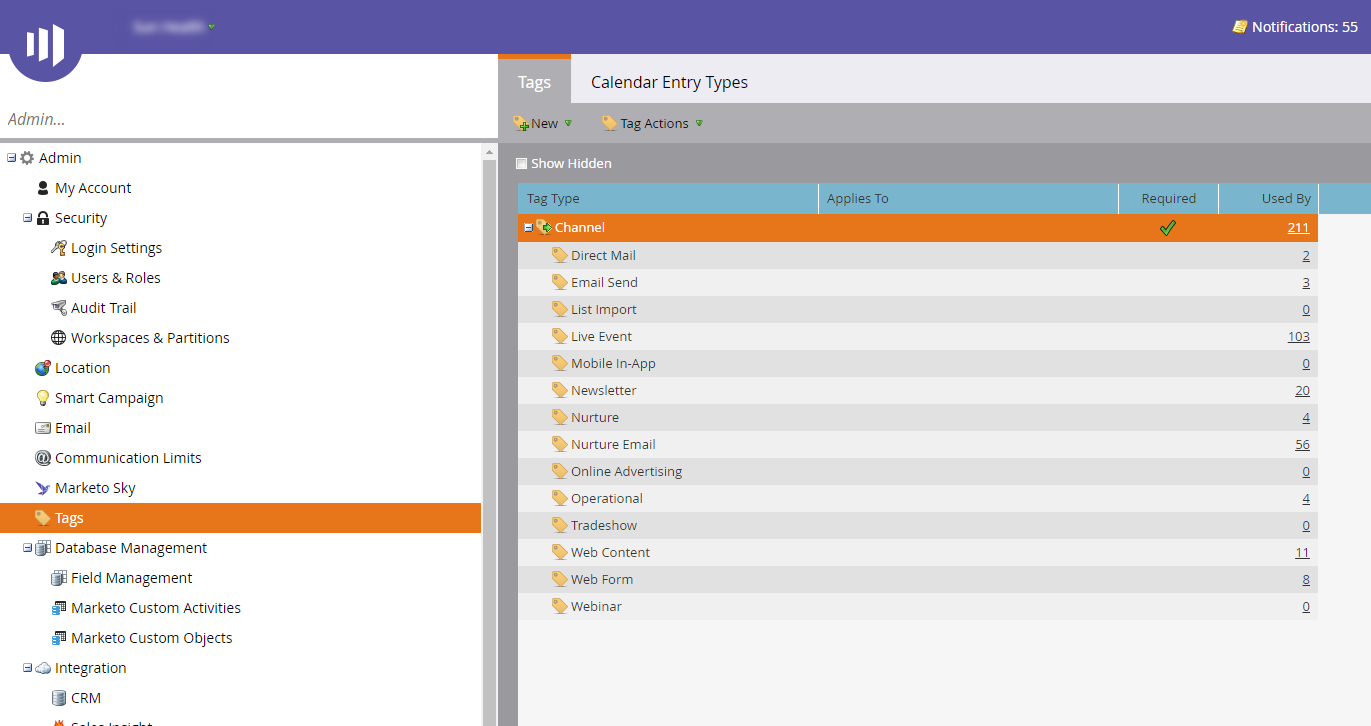
An event program is simply a type of program that can be used to automate your offline or online events. An event program has attendees at a specific day and time. The first step when creating the event setup is to create and define statuses for the event program. To do this, click on the admin tab within your Marketo instance, then click tags within the options shown.
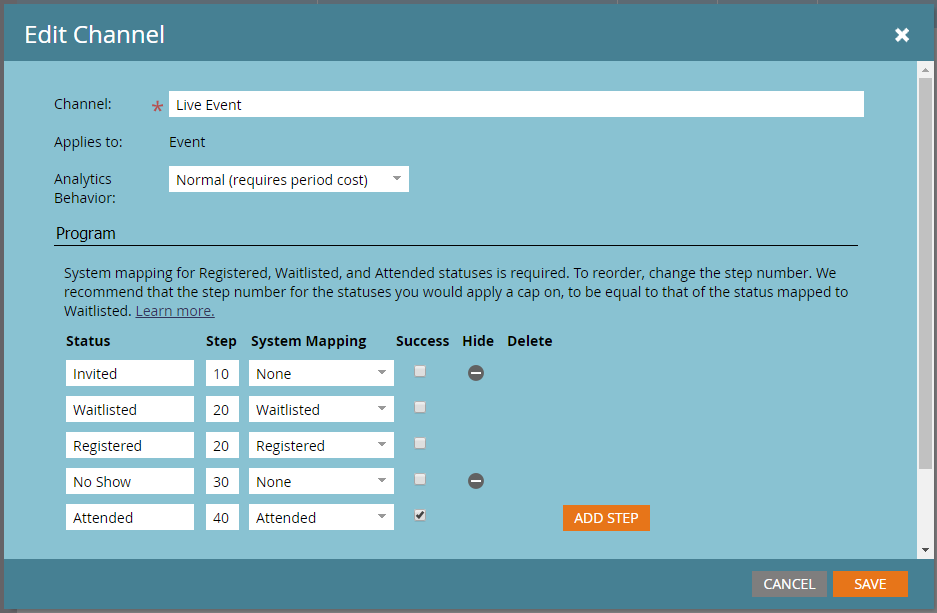
Next, you’ll want to create a new channel by clicking the new button at the top tool bar. Start by naming your channel something that makes the most sense for you. I like to set mine up by calling it “Live Event.” From here, define your program statuses and the order in which they should occur by setting an incremental number under the step portion. This helps the system understand the flow of statuses an attendee will go through. Lastly, determine which status signifies a program’s success. For events, our main goal is to capture attendees, so include the checkmark next to the “Attended” status. Your setup should look like this:
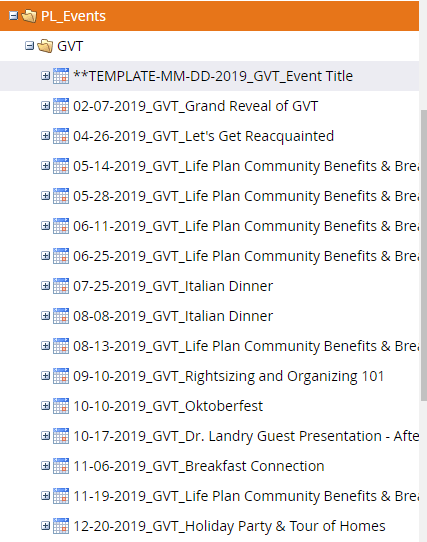
Next, create an event folder in the Marketing activities section of Marketo to organize all the event programs you plan to create. If you have different business units or locations, create additional folders to separate these out as well. Having a folder system and standardized program naming convention is critical to the level of organization you will want later down the road when you are managing multiple events at once, or when you need to pull a report for an entire year’s worth of events at a moment’s notice. Be sure to include event dates, location abbreviations, and event names in your program naming convention to simplify the search process when using the search bar. This will give you high level insight into what the event was, without having to click more to find out specifics such as the name or event date. Below is an example of what yours could look like:
Event Template
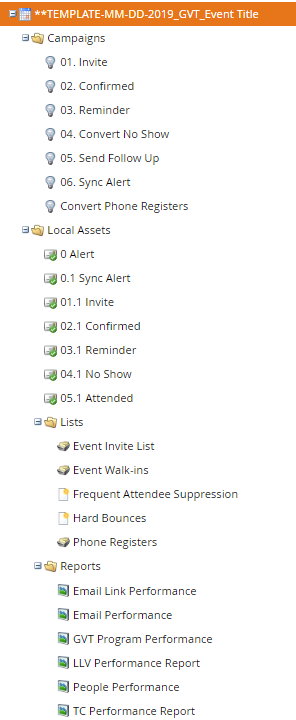
Cloning is one of the most used features in any marketing automation tool. It simply helps cut down the length of time it takes to create a program from beginning to end. It’s also crucial in creating a standardized process to create consistency with not only the look and feel of your email assets, but also the process in which a contact flows through the different event program statuses to ensure they receive the right communication at the right time. To ensure this consistency, start by creating an event program template. This will have all the smart campaigns and email assets included so your process stays consistent from beginning to end. Within your event program template, I recommend creating a folder for all your smart campaigns, a folder for all your email assets, a folder for all your smart and static lists, and then a folder for any pre-built reports you would like to include. Your program structure might look like this:
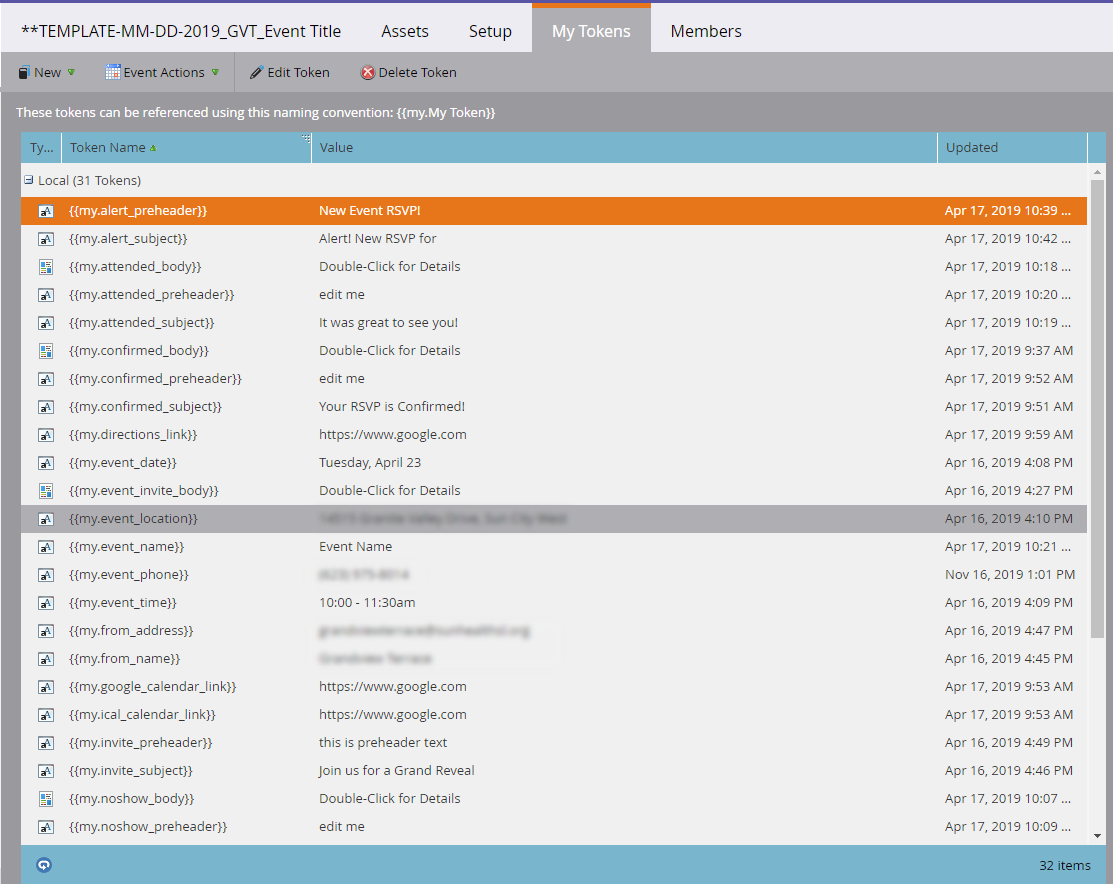
What are My Tokens?
My Tokens is a Marketo feature which includes custom variables that are created in either campaign folders or program types. When setting up your event communications, you often have repetitive information in nearly all email assets that can include event day, event time, and event location. Without using My Tokens, you would have to individually go in and update all your email assets to include the correct day, time, and location. This may not seem that big of a deal initially, but what happens if the event day, time, and location need to change due to some unforeseen reason? You would be forced to repeat the steps and go through all the email assets you have to update the information. This creates wasted time and energy, but also leaves you vulnerable to mistakes with potential spelling errors and missing proper punctuation.
Marketo offers a variety of token types that you can utilize based on the variables you wish to include in each design asset. These can include date tokens, number tokens, rich text html tokens, and plain text tokens. To customize your event program template using My Tokens, select the My Tokens tab within your created event program template and then select the token type you would like to create from the right-hand side panel. Simply give it a token name and a pre-set value that will be interchanged with each specific event. Once all your tokens have been created, input the token code within your email assets templates, which I will cover in the next section. See below on some ideas of token variables you may want to include:
Email Templates
If coding email templates using HTML code isn’t your strong suit, you may want to ask an HTML developer to help you with this next step. To begin, click on the design studio tab of your Marketo instance. This is where your email templates will be housed for further use across your event programs. As with everything in Marketo, you will want to create an event email folder to keep all your email assets neatly organized for future use and potential template updates.
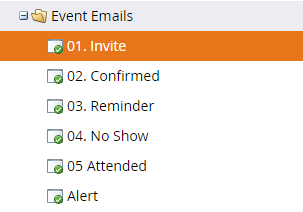
Depending on your communications strategy, you may want to include fewer or more communication emails, so your number may differ from my example below. But, I like to create five customer facing templates and one internal registration alert template. The five customer facing templates include an invite, an RSVP confirmed, a 24-hour event reminder, an RSVP no show, and a thank you for attending template.
Along with your HTML developer, you may also want to work alongside your email designer to help with incorporating the overall look and feel for each template. This should include your company branding with proper fonts and colors. You might also ask them to provide you header images and footers for each template if they are not already included in your design studio files. After your design has been approved and configured, add your previously created My Tokens. Your template should be a combination of hard coded text and My Tokens. Here is an example of what an email template could look like. This example is for the invite email template:
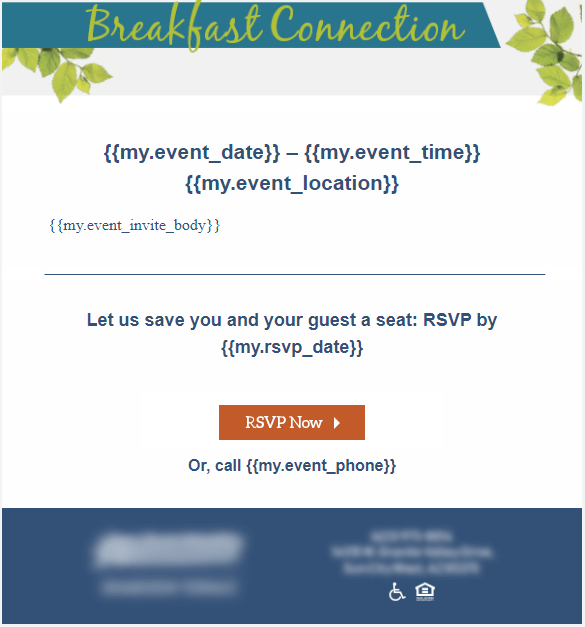
You may notice the body token has the word invite included. This means this particular body is specific to this template, whereas the event date, time, and location are not specific to the invite template because those tokens will be used in other email templates such as the 24-hour reminder and RSVP confirmation email.
Event Smart Campaigns
Smart campaigns are where the magic happens within Marketo. They hold the power to decide who gets what content and when. They also have the ability to update statuses and change field property values. They are simply the most important feature in any marketing automation platform. They are the engine to what makes everything work.
There are essentially three main areas of any smart campaign you should be aware of. There is the smartlist, which defines WHO you want to target for campaign entry. This can be made up of, but not limited to, members of another smart list or static list, a specific field property value, actions taken on a specific email or website, or filter on any status within a program. The second area is the flow which defines WHAT you are trying to accomplish with those that qualify. This can include, but is not limited to, sending an email, updating a person’s score, changing a property value, or updating a program status. The last area is the schedule, this is where you determine the day and time the campaign should launch. You can set this up as a one time send or a reoccurring send.
This next section will discuss each smart campaign setup for your event program template. This is a crucial step in the process, because this will ultimately determine every level of automation you need to make your event programs scalable.
Campaign #1: Invite
Smartlist:
This is who you want to invite to the event. You can use a combination of property field statuses or an already created smartlist.
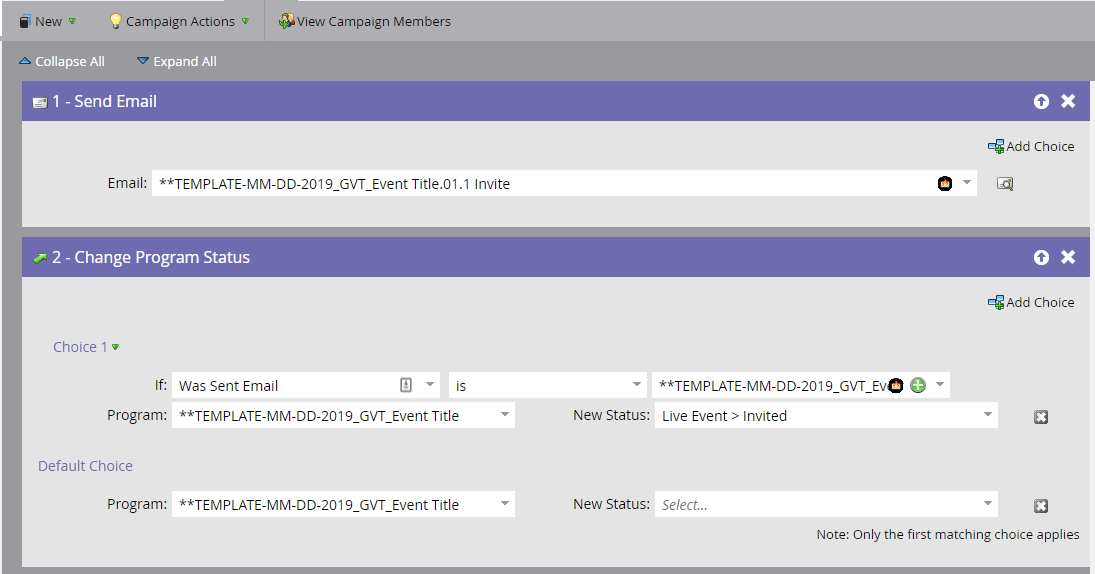
Flow:
The goal here is to send the invite email and then change program status on the contact to “Invited.”
Schedule:
Set up the day and time you would like the invite email to go out.
Campaign #2: Confirmed
Smartlist:
Depending on your event strategy, your smartlist will likely differ from my example of a confirmation email send smartlist. However you set up your system to know when someone has registered to the event, you will need to include that logic here. In most cases, you will have a form on a landing page where you can include form submission logic as your smartlist.
In my example, we use the same form on our event landing pages and include a hidden value on a custom property field that provides the event program name for each specific event. Be sure to begin your smartlist with a trigger and not a filter, as RSVPs are entered anytime of the day and will require a confirmation email send almost immediately rather than on a set schedule. Triggers are defined in orange and filters are defined in green.
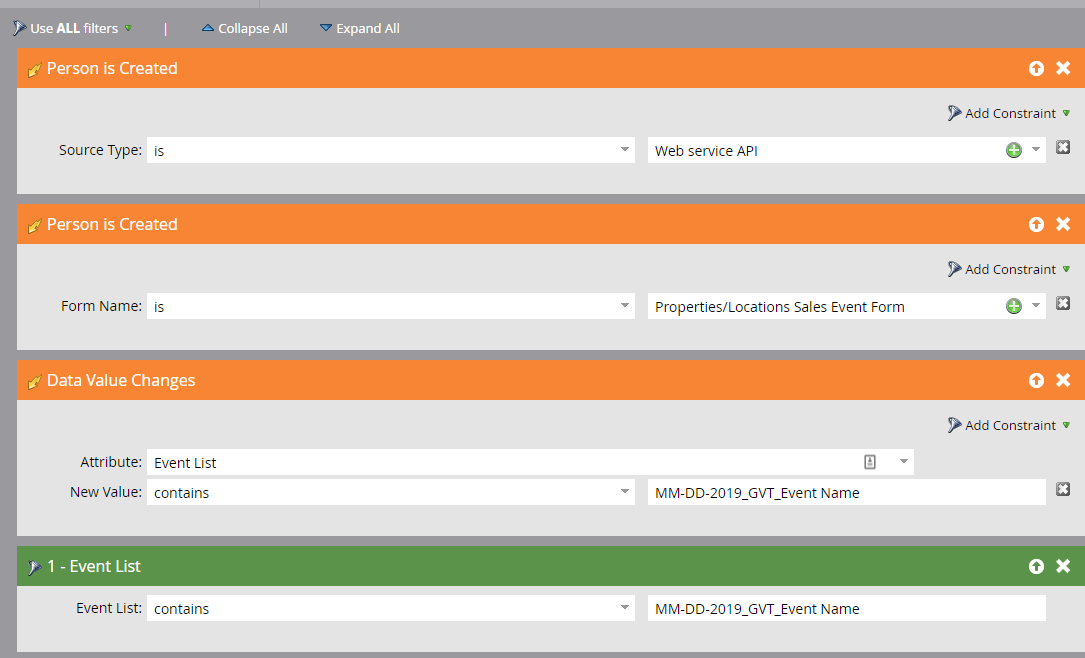
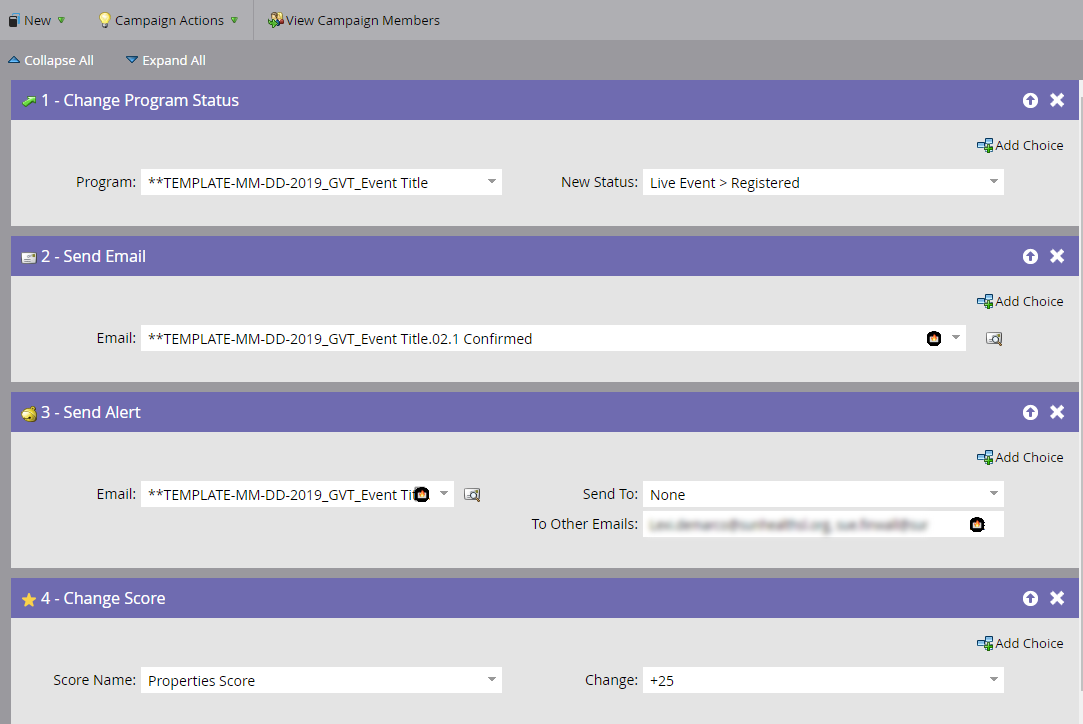
Flow:
This is where you will change the program status of the RSVP to a registered status, send out the confirmation email to the contact, alert your internal team of the new registration using your alert email template you created, and then increase the score for registration (if this is part of your funnel communications strategy).
Schedule:
Because this is a trigger-based campaign, it is not necessary to schedule it on a specific day or time. You will just need to click the orange activate button within the schedule tab to turn this campaign on. Once activated, any form fills from your desired event program entry will automatically flow through your flow logic. As always, be sure to test this functionality before going completely live on your website or landing page.
Campaign #3: Reminder
SmartList:
Here, enter the contacts who have registered to the event. This can be done with this filter.
Flow:
This is where the majority of the automation work is accomplished and set up. I wanted to create a campaign that could not only send out the reminder email, but also send an alert internally to remind the event coordinator to sync the event app after the event is completed. This step is important because you need to be sure all attendees are checked in so you can use their statuses to send out the follow up “no show” and “attended emails” in a timed systematic cadence. Below are my flow steps that include reminder email send, delay times, and daisy chain campaign entry using the Marketo request campaign flow functionality.
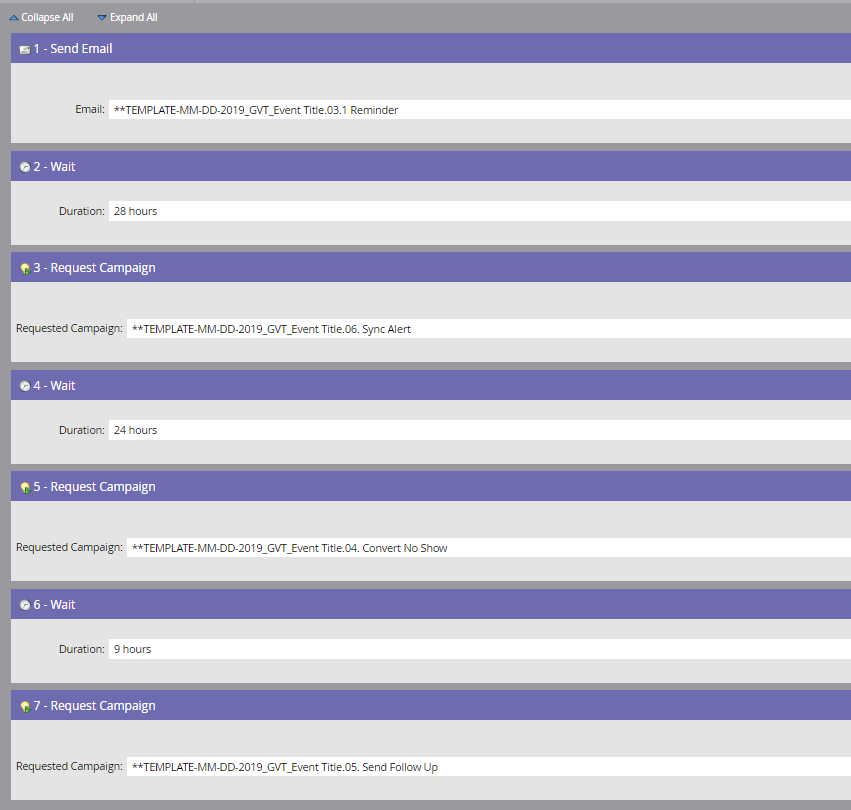
Schedule:
Scheduling can be done at the time of event program creation and is set up to launch exactly 24 hours before the start time of the event. Exactly four hours after the start of the event, a sync alert email is sent internally to remind the event coordinator to sync all attendees. Then 24 hours after, an automation campaign is triggered to convert anybody with a registered status to an event no show status. Nine hours after that, follow up emails are sent out based on your status of either being a no show or attendee.
Below are how these campaigns are setup.
Campaign #4: Convert No Show
Smartlist:
This must include a trigger action with “campaign is requested.” Your source will be Marketo flow action from your reminder campaign setup. Be sure to include a member of the program filter as well with a constraint to only include members with a status of registered. This will filter members that had attended your event and those that have a invited status.
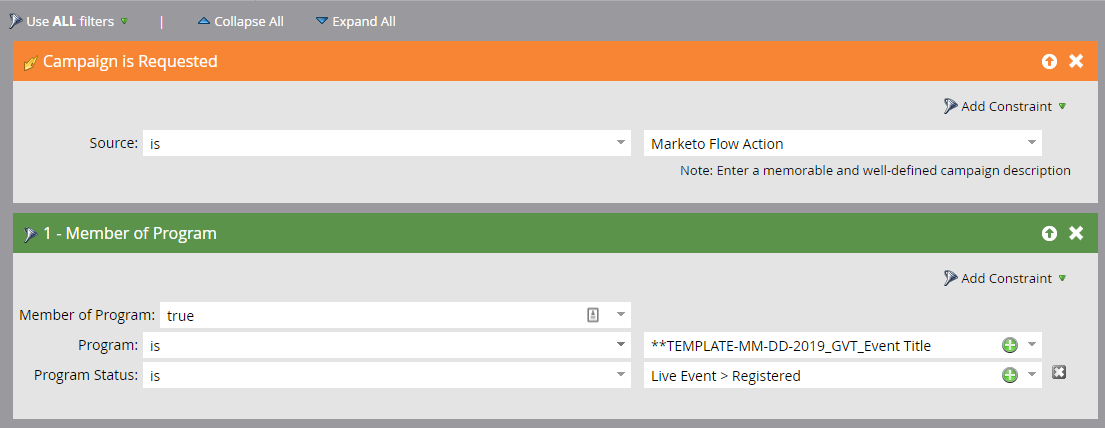
Flow:
The flow step is to simply change the program status to a no show. This will be required for the next campaign when you send out your follow up emails.

Campaign #5: Send Follow up
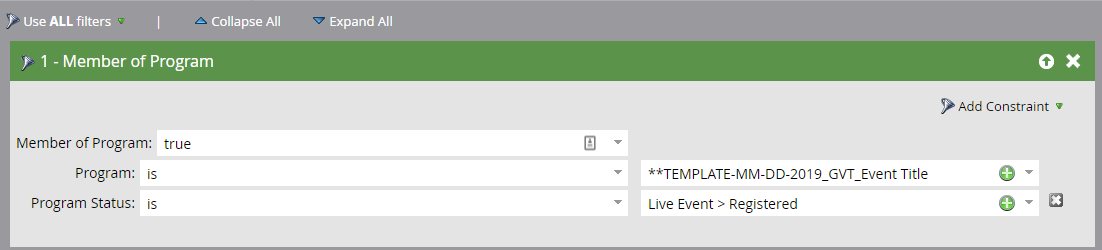
Smartlist:
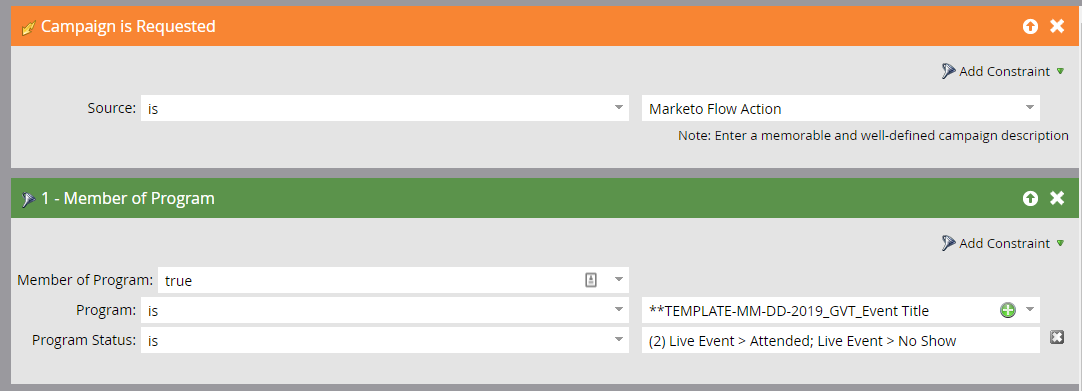
Setup your smartlist with a trigger action “campaign is requested” and a source value as Marketo flow action. Then, include a member of the program filter that includes a status constraint to only include members with a status that is event attended or event no show.
Flow:
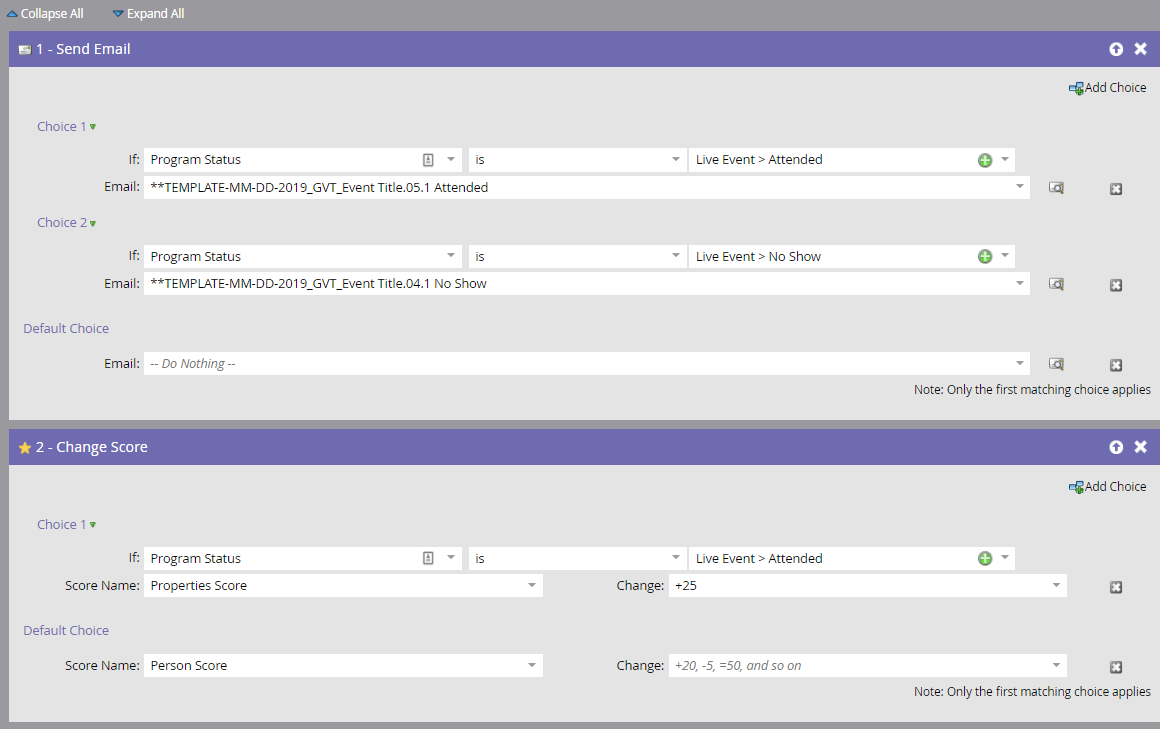
Flow setup should send the correct emails to the correct statuses. Use the choice option to delegate who should get what in the same flow step. If the program status is attended, then send the attended email. If program status is no show, then send the no show email. If scoring is important to you and your Marketo strategy, provide scoring within the same flow campaign as well. Within my example, I want to add 25 points to those that attended.
Campaign #6: Sync Alert
Smartlist:
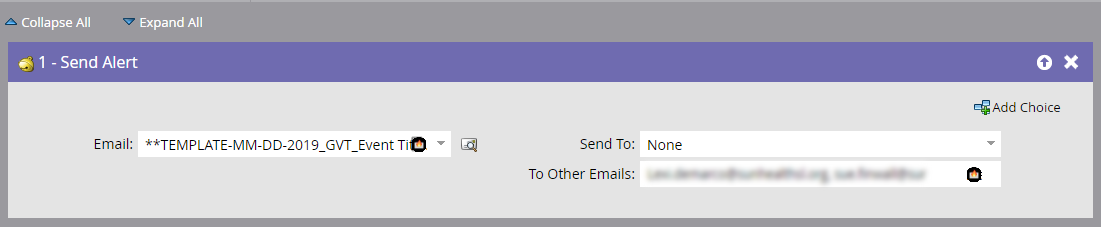
This campaign has one simple purpose that you may feel is optional in your organization. The goal here is to send an alert reminder to the event organizers to remember to sync the iPad with the Marketo database. Without the sync, the Marketo database isn’t aware who attended and who did not even if you marked someone as attended. Without this step, all attendees will be marked as no shows which will ultimately send the wrong email to those that attended the event.

Flow:
Make sure the correct alert email you created is chosen in the email name section for alert flow step. You will also want to include the email addresses of who should be alerted. This can be one person or many. If your instance is connected to a CRM, you can select a contact or account owner from there as well.
Conclusion
One of the keys to putting on a successful event for your business is to have a process in place for consistent and accurate event communications that alleviate the hassles and headaches that typically arise when setting one up. One important aspect is to have a well thought out process and plan in place that can easily be cloned from event to event. Utilizing tools such as Marketo can be a driving and helpful force when achieving a level of efficiency. Marketo functionality such as event templates, My Tokens, email templates, and smart campaigns can be a huge help when keeping everything consistent and accurate to ultimately make for not only a better end user experience, but also a better day to day workflow experience.