
The Planning Process of Building a Website
When building a website, a common tendency is to jump straight into the visual design. “What’s it going to look like?” “What will the colors be?” “Can it have a video on the homepage?” We get these questions all the time and I don’t blame anyone; these are the fun and exciting parts of a website! But we need to take a step back and start with the bigger questions, “Who is going to use this website?” “What do we want this website to accomplish?” “How will our users interact with the site?” We like to tell our clients that building a website is like building a house; you need to have a solid plan and strategy behind it, otherwise it just won’t do the job.
So how do you build a solid plan for your website so you can hurry up and get to the fun stuff? Here are seven key steps to the website planning process:
1. Define your goals
First you need to take a step back and look at your business. What are your business goals? For many people, the answer to this question is to gain new customers or to increase ROI (return on investment), but we need to dive deeper into your tactics. How do you do this? Do you sell a product, a service, information? Write these things down. I know, this may seem terribly elementary, but it really does help to see it written down. Think about where you want your business to be five years from now. How do you plan to get there?
How Your Website Plays a Part
Once you’ve defined your business goals and tactics, it’s time to think about your website. How will your website help you to achieve these goals? If your website is an ecommerce site, then this may be an easy answer: by selling products online. For others, the answer could be to inform your audience of your cause by offering a library of useful content and resources. Whatever the answer is, ensure that it aligns in some way with your overall business goals.
Goal Examples:
An example I’ll use throughout the post is from one of our clients, AV Homes, a home builder that we recently built a website for. For their privacy I won’t go into detail on their specific business goals and tactics, so we’ll take a high level look:
- Their business goal: Sell homes
- How they plan to do it: Show how great the communities and the homes are
- How the website will achieve these goals: Create an easy to use website that allows people to find a community and a home that they love
Doing this exercise helps you clearly see what your main goals of the website are. If that cool video you wanted to put on the homepage doesn’t help you achieve your goal, maybe you need to reconsider.
2. Understand your users
Understanding your users is an extremely important step of the website process. At Zion & Zion, we like to understand our users on a deeper level than just their demographics, but understand their psychographics and their technographics as well. What are their values? Their goals? Are they extremely technical, or are they not very tech-savvy? Thinking about your users as actual people and not just “our target audience” will help you connect with them on a personal level.
Creating Personas
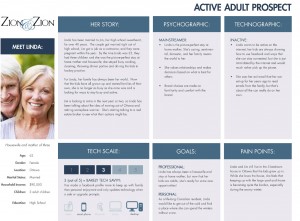
To help us do this, we create personas to give a face to the different members of our target audience. Depending on the business we like to create 3 to 5 personas to cover a wide range of the target market. For AV Homes, we created a handful of personas that covered their target market’s age, income and location range.
Example:Here’s one of the personas we created for AV Homes, Linda.
After reading about Linda’s life, you really feel like you understand her, her goals, and what she is looking for. We use these personas throughout the entire web process, from initial planning through web development. As you write your web content, think about each one of your personas specifically. Would Linda connect with the verbiage used? Would this headline speak to her? Then think about her again during your design phase; would this imagery resonate with her? Keeping your users in mind helps ensure that you’re creating a website that will help your users, which will in turn help you.
3. Research your competition
Doing an analysis of what your competitors are doing online will help you to better understand what you’re up against. Go through their website from each persona’s point of view. What tools and resources do they offer? What kinds of things do they do well? What do they do poorly, and how can you do a better job of this? Consider the following:
- Design techniques
- Imagery used
- Functionality used
- Content organization
- Voice and tone
Viewing your competitor’s website through the eyes of your persona will help you to get an unbiased understanding of the decisions your users need to make. Are there specific services or benefits that you offer that your competition doesn’t? These are the things that make you different than your competition and should be highlighted on your website.
4. Gather & group your information
Now that you’ve taken into account your business, your users and your competitors, it’s time to take a closer look at what information you have access to. If you have an existing website, you can do a content audit. While these are not very fun to do, they can be extremely beneficial. UX Mastery has a great step-by-step instruction guide on /how to properly do a content audit. This will help you to visualize what information you already have on your website and figure out if there are gaps in your content, duplicate content, or content that no longer serves your business or your users.
Grouping your content
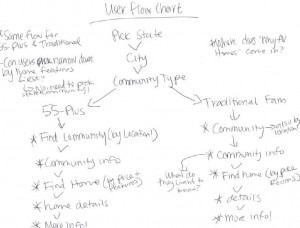
Once you have a clear picture of what information exists already, what your users want, what your business requires, and what your competitors are doing, you should have a basic idea of what your website should consist of. Organize the information you want on the website into a priority order. What is most important? What would be great to have, but not beneficial? With a clear list of what information you want on your site, you can start to group your information in chunks that make sense to your users and your business. There are multiple techniques for doing this, like /card sorting or creating /sitemaps and user flow charts. Find the best technique to allow you to group and organize your content into sections. I like to create low fidelity sitemaps and flow charts, like the ones pictured here for AV Homes, to help me to visually see the best way to group pages and content together and see how those pages relate to each other.
Example: Here’s one of the first user flow charts I did for AV Homes. Don’t mind my messy hand-writing!
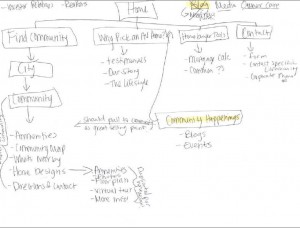
A low-fidelity sitemap:
5. Sketch your ideas
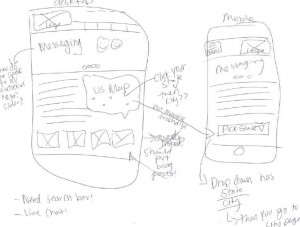
This is my favorite part of the process because you can start to see your research and ideas come together! Sit down with blank paper and a pencil and start to sketch your ideas for the homepage. Based on your priority listing from the previous step, keep high priority information easily accessible and towards the top. This step is supposed to be very low fidelity, it’s your chance to try out new ideas so don’t get hung up on the lines being perfect. See my sketch below for an example of one of the sketches we did for AV Homes. If you’d like to take a Mobile First approach, I highly suggest you read /Luke Wroblewski’s book and start sketching a mobile homepage before the desktop version.
Keep sketching!
Don’t sketch one idea and call it quits; sketch out different layouts until you find a couple options that you think may work. This is your chance to be creative and break boundaries, try new layouts and incorporate new functionality! Sketch away!
Example: One of my very low-fidelity sketches for AV Homes. Not the most beautiful thing, but it does the job.
6. Test your ideas
You should now have a couple homepage sketches that you like. The point of all the upfront work you did is to make sure you create a website that is not just based on your personal opinions, but is based on what your users and your business need, so now it’s time to test! Sit down with each persona you created and walk through your website sketches. Would the persona be able to find the information they need? Think about their goals and why they came to your website. Also consider their level of technical skills and the functionality you’ve planned. If your personas are not very tech-savvy you should stay away from a high-tech interface that you think is cool. Remember that you aren’t building this website for you, it’s for your users, so don’t be biased!
Discuss your ideas
Test all of your sketches and even grab coworkers, family or friends to walk through your ideas with. Often times just talking through your ideas out loud can help you see a little clearer and help to narrow down your choices, or even come up with a better solution altogether! Just remember to try and keep personal opinions to the side, question every decision you make against your business goals and your user’s goals.
7. Architect your plan
Once you have a sketch of a homepage layout and a rough draft of a sitemap or user flow chart, it’s time to start a /wireframe! At Zion & Zion, we tend to do pretty high-fidelity wireframes as it allows us to work together to thoroughly plan the site before we get to design mockups or coding.
Our Wireframe Strategy
We usually build wireframes for all of the key pages of the site, as well as mobile wireframes for responsive websites. Our wireframes include notes throughout the site to explain why we made some of the decisions we made, or explain planned functionality that may not be obvious at first glance. We find that building these detailed wireframes allows our team and other stakeholders to fully understand the plan and the pages of the website before we get too far along in the process. It also gives us another chance to test the content, the page hierarchy and planned functionality against our personas and business goals. Moving boxes around in a wireframing tool is much easier than moving designed elements around once the site is designed or coded, so this is the phase to get everyone on board with the website plan!
Wireframing Tools

We like to use /Mockflow to create our wireframes, but there are a ton of other great wireframing tools out there! For us, Mockflow is easy to use with its drag and drop components, and we love that it’s a web-based application so you can send out a link for everyone on the project to view the wireframe at any time. You can also add clickable buttons and links so it’s really easy to demonstrate planned functionality without code.
Example: Here’s the detailed homepage wireframe we built in Mockflow for AV Homes.
Now for the fun stuff!
Once you have a wireframe that meets all of your requirements, you’re ready to move into the design phase and start adding life to the site! Since you have thoroughly strategized your user’s goals, your business goals, and how the site will achieve those goals, you will have a much more successful site than had you jumped right into the design phase! I highly suggest adding Google Analytics code to your existing site, and also to the new site once it’s built so that you can see the difference in traffic and hopefully conversion!
A big thanks to AV Homes for letting us use them as an example for this post!